Light bulb cameras are convenient when they work properly, but they combine several systems into one device.
A typical light bulb camera depends on:
Power + Wi-Fi + camera hardware + mobile app + storage
A problem with any one of these can make the camera appear broken.
The good news is that many common light bulb camera problems can be narrowed down with a few simple tests.
This guide covers cameras that won’t turn on, Wi-Fi connection problems, cameras that keep going offline, motion detection issues, poor night vision, microSD card problems, two-way audio, pan-and-tilt problems and more.
Before factory resetting or replacing the camera, start by identifying which part of the system is actually causing the problem.
Start Here: What Part Is Causing the Problem?
When a light bulb camera stops working, troubleshoot it in this order:
Power → Wi-Fi → App → Camera → Storage
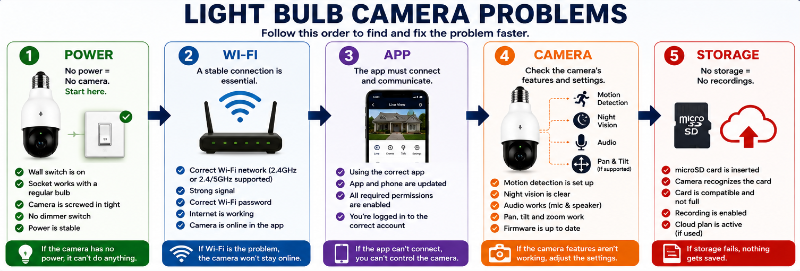
This order matters because there is little point troubleshooting motion detection or recordings if the camera is not receiving reliable power or cannot stay connected to Wi-Fi.
1. Power
Is the camera receiving continuous electricity from the socket?
2. Wi-Fi
Is the camera connected to a compatible Wi-Fi network with a strong enough signal?
3. App
Can the app communicate with the camera, and are the required permissions and settings enabled?
4. Camera
Are the lens, motion detection, night vision, microphone, speaker and pan-and-tilt functions working correctly?
5. Storage
If the camera works normally but recordings are missing, the problem may be with the microSD card, cloud plan or recording settings.
Light Bulb Camera Won’t Turn On
If the camera appears completely dead, start with the socket rather than the app.
Check:
- Is the wall switch turned on?
- Does the socket work with a regular light bulb?
- Is the camera screwed securely into the socket?
- Is the fixture compatible with the camera?
- Is a dimmer switch controlling the socket?
- Is the camera within its specified operating conditions?
A switched light fixture is one of the easiest problems to overlook.
If someone turns off the wall switch, the camera loses electricity just like an ordinary bulb.
That means:
No power = no camera + no Wi-Fi + no recording + no notifications.
For more on this issue, see Do Light Bulb Cameras Work When the Light Is Off?.
Test the Socket
Remove the camera and install a normal bulb that you know works.
If that bulb also does not turn on, troubleshoot the fixture, switch or electrical supply rather than the camera.
If the regular bulb works normally but the camera does not, the problem is more likely related to the camera, its fit in the socket or compatibility with the fixture.
Camera Has Power but Won’t Connect to Wi-Fi
If the camera powers on but will not connect, check the network requirements for your exact model.
Common causes include:
- Incorrect Wi-Fi password
- Unsupported Wi-Fi band
- Weak signal
- Camera too far from the router
- Incorrect setup procedure
- Phone permissions blocking setup
- VPN interference during setup
- Camera not in pairing mode
Check Whether Your Camera Requires 2.4 GHz
Many light bulb cameras use 2.4 GHz Wi-Fi, but this is not universal.
Some newer models support both 2.4 GHz and 5 GHz.
Do not assume either way. Check the specifications or support information for your exact camera.
If your model supports only 2.4 GHz, trying to connect it to a 5 GHz-only network can prevent setup.
For a complete walkthrough, see Light Bulb Camera Not Connecting to Wi-Fi.
Camera Works Near the Router but Not in Its Final Location
This is one of the most useful diagnostic tests you can perform.
If the camera works reliably in a socket near your router but becomes unstable when moved outside or farther away, the camera itself may be fine.
The likely problem is Wi-Fi coverage at the installation location.
Signal can be weakened by:
- Distance
- Exterior walls
- Brick
- Concrete
- Metal siding
- Garage construction
- Other wireless interference
- The location of the router
Do not factory reset a camera repeatedly if it consistently works near the router.
Instead, investigate the Wi-Fi signal where you actually want to install it.
Light Bulb Camera Keeps Going Offline
A camera that connects successfully but repeatedly goes offline may have a different problem from one that never connects at all.
Check:
- Wi-Fi signal strength
- Whether the socket is losing power
- Whether someone is using the wall switch
- Router stability
- Camera firmware updates
- App updates
- Internet outages
- Whether the problem happens only at a particular location
A useful test is to move the camera temporarily to a socket close to the router.
If the disconnects stop, Wi-Fi coverage is a strong suspect.
If the camera still disconnects while close to the router, investigate the camera, app, account or router.
Camera Won’t Connect After Changing the Router or Wi-Fi Password
The camera may still be trying to connect using the old network information.
Depending on the model, you may need to:
- Open the camera app.
- Look for an option to change or update the Wi-Fi network.
- Put the camera back into pairing mode.
- Enter the new Wi-Fi information.
- Set the camera up again if required.
Some models may require removing and re-adding the device or performing a reset.
Follow the manufacturer’s instructions for your exact model before factory resetting it.
The App Can’t Find the Camera
If the camera has power but the app cannot discover it, check:
- Is the camera in pairing or setup mode?
- Is your phone connected to the correct Wi-Fi network?
- Does the app have the permissions required for setup?
- Is Bluetooth required during setup?
- Is location or local-network access required?
- Is a VPN interfering with setup?
- Are you using the correct manufacturer’s app?
Camera apps vary considerably, so follow the setup instructions for your particular model.
The Camera Won’t Scan the QR Code
Some cameras use a QR code displayed on your phone during setup.
If the camera will not recognize it, try:
- Increasing your phone’s screen brightness
- Cleaning the camera lens
- Holding the phone directly in front of the camera
- Moving the phone slightly closer or farther away
- Avoiding glare on the phone screen
- Making sure the complete QR code is visible
If the app offers another pairing method, you can also try that method.
Light Works but the Camera Doesn’t
If the built-in light works but Live View or camera functions do not, the fixture is probably providing at least some power.
Next check:
- Camera status indicator
- Wi-Fi connection
- Internet connection
- App status
- Firmware
- Whether the camera appears online in the app
Try a normal power cycle before performing a factory reset.
Turn off power to the camera, wait about 10 seconds, restore power and give the camera time to reconnect.
Camera Works but the Light Doesn’t
The camera and visible light may have separate settings even though they share the same electrical supply.
Check the app for:
- Light on/off control
- Brightness
- Motion-activated lighting
- Lighting schedules
- Night settings
- Automations
If the camera operates normally but the visible light does not, do not immediately assume the whole device has failed.
First make sure the light has not simply been disabled or scheduled differently in the app.
Motion Detection Isn’t Working
If the camera provides Live View but does not detect motion, check the detection settings.
Look for:
- Motion detection enabled
- Detection sensitivity
- Detection zones
- Person or human detection settings
- Notification schedules
- Do Not Disturb settings
- Phone notification permissions
For testing, temporarily simplify the configuration.
For example, enable general motion detection and increase sensitivity. Once you confirm detection works, refine the zones and sensitivity to reduce unwanted alerts.
Too Many Motion Notifications
The opposite problem is a camera that alerts you constantly.
Common triggers can include:
- Moving tree branches
- Passing vehicles
- People walking on a nearby sidewalk
- Insects near the camera
- Shadows
- Rain or snow
- Changes in lighting
Depending on your camera, try:
- Reducing motion sensitivity
- Creating detection zones
- Using person detection
- Changing the camera angle
- Excluding a busy street or sidewalk from the detection area
Good placement can be just as important as changing the software settings.
See Where to Install a Light Bulb Camera for placement guidance.
Notifications Arrive Late or Not at All
If motion is being detected but your phone does not alert you correctly, check both the camera app and your phone.
Possible causes include:
- Notifications disabled in the camera app
- Notifications disabled in phone settings
- Battery-saving restrictions
- Weak camera Wi-Fi
- Internet delays
- Notification schedules
- Do Not Disturb or Focus modes
Check whether events are actually appearing in the app.
If recordings are present but phone alerts are missing, the problem may be notification-related rather than motion detection itself.
Night Vision Is Blurry or Washed Out
Night-vision problems are often caused by placement rather than a defective camera.
Infrared light can reflect from nearby surfaces and back into the lens.
Possible causes include:
- Glass directly in front of the camera
- A wall or ceiling too close to the lens
- A fixture surrounding the camera
- Dirty lens
- Spider webs
- Rain, fog or condensation
- Nearby reflective surfaces
If the image looks good during the day but becomes bright, hazy or washed out at night, look for something nearby reflecting the camera’s infrared light.
Changing the angle or moving the camera away from the reflective surface may help.
Camera Image Is Blurry or Poor Quality
Start with the simple things.
- Clean the lens carefully.
- Remove any protective film left from installation.
- Check the Wi-Fi signal.
- Check the selected video-quality setting.
- Make sure the camera has a clear view.
- Check for condensation or moisture.
A weak connection can also make Live View appear lower quality or less stable even when the camera’s sensor is capable of a sharper image.
Pan-and-Tilt Isn’t Working
If your camera supports motorized pan-and-tilt but will not move correctly, check:
- Whether anything physically blocks movement
- Whether the fixture interferes with the camera body
- Pan-and-tilt controls in the app
- Motion-tracking settings
- Firmware updates
- Whether restarting the camera restores movement
Do not manually force a motorized camera beyond its intended range.
If the camera clicks, grinds or repeatedly becomes stuck even with nothing blocking it, contact the manufacturer.
microSD Card Isn’t Detected
If the camera works but does not recognize the memory card, check the manufacturer’s storage requirements.
Possible causes include:
- Card not fully inserted
- Unsupported capacity
- Unsupported card type or speed
- Incorrect file system
- Corrupted card
- Failed microSD card
Card requirements vary significantly between cameras, so do not assume a card that works in one camera will automatically work in another.
Power down the camera or follow the manufacturer’s instructions before removing the card.
Camera Isn’t Saving Recordings
If Live View works but recordings are missing, the problem may be storage or recording settings.
Check:
- Is a microSD card installed?
- Does the app recognize the card?
- Is the card full?
- Is event recording enabled?
- Is continuous recording enabled if supported?
- Does recording require a cloud subscription?
- Has the cloud plan expired?
- Are motion events actually being detected?
Some cameras overwrite older recordings automatically when local storage becomes full, while others handle storage differently.
Check the documentation for your model.
Be Careful Before Formatting a microSD Card
Formatting is a common troubleshooting step, but it normally erases the recordings stored on the card.
Save any footage you want to keep before formatting.
Two-Way Audio Isn’t Working
Two-way audio depends on several components:
Camera microphone + camera speaker + app + phone microphone + network connection
If it does not work, check:
- Phone microphone permission
- Camera microphone setting
- Speaker volume
- Whether audio is muted in Live View
- Wi-Fi connection quality
- Whether anything blocks the camera microphone or speaker
Some delay during two-way communication can occur because audio must travel through the network.
For more on camera audio, see Do Light Bulb Cameras Record Audio?.
The Camera Keeps Restarting
Repeated restarting can point to unstable power, software problems or a hardware issue.
Check:
- Whether the camera is fully seated in the socket
- Whether the socket is controlled by a dimmer
- Whether the fixture provides stable power
- Whether firmware is current
- Whether the camera behaves the same way in another known-good socket
Testing the camera in another compatible socket is especially useful.
If it works normally elsewhere, investigate the original fixture or power source.
If it repeatedly restarts in multiple known-good locations, the camera itself becomes a stronger suspect.
Outdoor Camera Problems
Outdoor installation adds environmental factors that do not exist indoors.
Potential problems include:
- Weak Wi-Fi through exterior walls
- Moisture
- Condensation
- Extreme temperatures
- Direct exposure to rain or snow
- Fixture compatibility
- Insects and spider webs around the lens
Make sure the camera is actually rated for the environment where you install it.
An indoor-only camera should not be treated as weatherproof simply because it screws into an outdoor socket.
See Best Light Bulb Cameras for Outdoor Use for more outdoor-specific considerations.
Camera Problem or Wi-Fi Problem?
Here is one of the easiest diagnostic tests:
- Move the camera temporarily to a compatible socket near your router.
- Connect it and test Live View.
- Test motion detection.
- Leave it running long enough to see whether it remains online.
If it works normally near the router: investigate Wi-Fi coverage at the original location.
If the same problem continues near the router: investigate the camera, app, account or router itself.
This simple test can prevent a lot of unnecessary resets.
Light Bulb Camera Troubleshooting Quick Guide
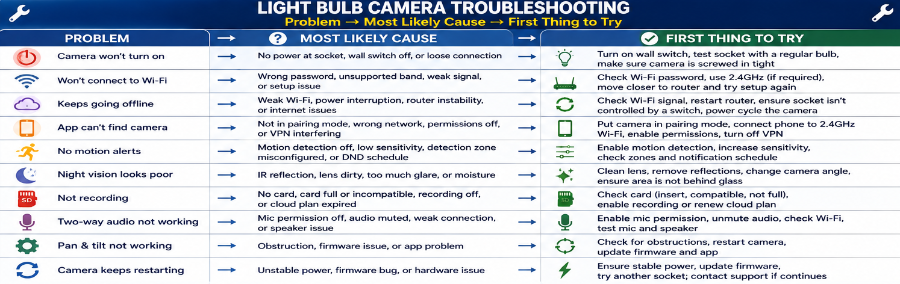
Camera Won’t Turn On
Check first: Socket and wall switch.
First thing to try: Test the socket with a regular bulb and make sure the camera is screwed in securely.
Camera Won’t Connect to Wi-Fi
Check first: Wi-Fi compatibility, password and signal strength.
First thing to try: Confirm the correct Wi-Fi password and network band, then move the camera closer to the router and try setup again.
Camera Keeps Going Offline
Check first: Wi-Fi signal and power stability.
First thing to try: Test the camera in a socket closer to the router.
App Can’t Find the Camera
Check first: Pairing mode and app permissions.
First thing to try: Put the camera back into setup mode and confirm the required phone permissions are enabled.
No Motion Alerts
Check first: Detection settings.
First thing to try: Enable motion detection and temporarily increase sensitivity.
Too Many Motion Alerts
Check first: Motion sensitivity and detection zones.
First thing to try: Reduce sensitivity or narrow the detection area.
Poor Night Vision
Check first: Infrared reflections.
First thing to try: Check for nearby glass, walls, fixtures or other reflective surfaces.
Blurry Video
Check first: Lens condition and connection quality.
First thing to try: Clean the lens and check Wi-Fi strength.
No Recordings
Check first: Storage and recording settings.
First thing to try: Confirm that the microSD card or cloud storage is active and recording is enabled.
microSD Card Not Detected
Check first: Card compatibility.
First thing to try: Confirm that the card capacity and format are supported by the camera.
Two-Way Audio Not Working
Check first: Microphone permissions and audio settings.
First thing to try: Enable microphone permission and make sure audio is not muted.
Pan-and-Tilt Stuck
Check first: Physical obstruction.
First thing to try: Make sure the light fixture is not blocking camera movement.
Power Cycle or Factory Reset?
These are not the same thing.
Power Cycle
A power cycle simply restarts the camera.
A typical approach is:
- Turn off power to the camera.
- Wait about 10 seconds.
- Restore power.
- Allow the camera time to restart and reconnect.
This usually preserves your settings.
Factory Reset
A factory reset returns the camera to its setup state and can require you to configure it again.
Depending on the camera, this may remove network settings and other configuration information.
Do not use a factory reset as the first solution for every problem.
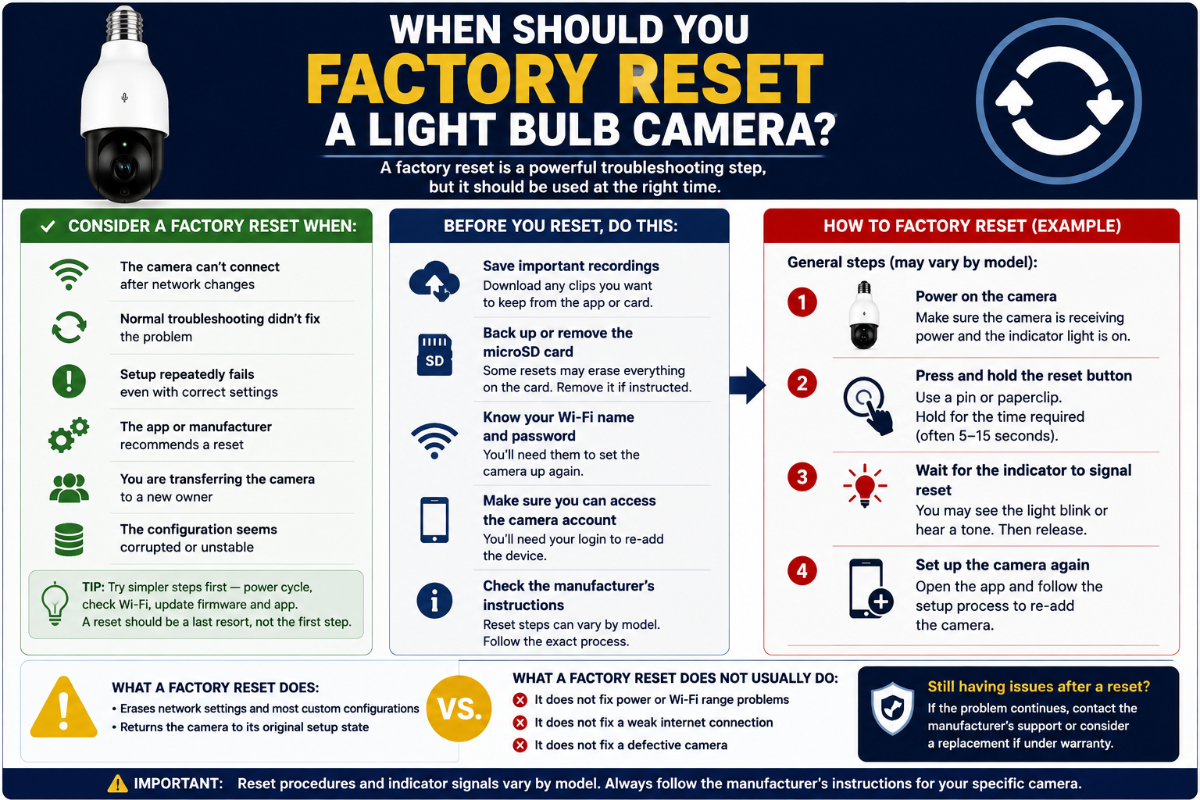
When Should You Factory Reset a Light Bulb Camera?
Consider a factory reset when:
- Normal restarting does not fix the problem
- The camera cannot reconnect after network changes
- Setup repeatedly fails despite correct network settings
- The app or manufacturer specifically recommends a reset
- You are transferring the camera to a new owner
- The configuration appears corrupted
Before resetting:
- Check the manufacturer’s instructions
- Save important recordings
- Know your Wi-Fi name and password
- Make sure you can access the camera account
- Remove the microSD card first if the manufacturer instructs you to do so
Reset procedures vary by model. Do not assume every camera uses the same button sequence or reset time.
When Is the Camera Probably Defective?
No single symptom proves that a camera has failed.
But replacement becomes more reasonable when you have ruled out the common external causes.
Warning signs can include:
- No power in multiple known-good compatible sockets
- Repeated restarting in multiple locations
- Motor grinding or mechanical failure
- Camera cannot complete setup even beside the router
- Persistent hardware errors after a proper factory reset
- Visible water damage
- Microphone, speaker, lens or motor failure that persists after troubleshooting
If the camera is still under warranty, contact the manufacturer before opening or attempting to repair it.
Don’t Overlook Firmware and App Updates
Before replacing a camera that behaves strangely, check for updates.
Firmware and app updates can address:
- Connection problems
- Compatibility issues
- Software bugs
- Security vulnerabilities
- Feature problems
Keeping the camera updated is also an important security practice.
See Are Light Bulb Cameras Safe From Hacking? for our camera-security checklist.
A Simple Troubleshooting Order
If you do not know where to start, use this order:
- Confirm power.
- Check the Wi-Fi connection.
- Restart the camera.
- Restart the app.
- Check camera and phone settings.
- Check for firmware and app updates.
- Test the camera closer to the router.
- Check storage if recordings are the problem.
- Factory reset only when appropriate.
- Contact the manufacturer if the problem remains.
This method helps isolate the problem rather than changing several settings at once and not knowing what actually fixed it.
Frequently Asked Questions
Why does my light bulb camera keep going offline?
Common causes include weak Wi-Fi, loss of power at the socket, router problems, internet outages or camera software issues. Test the camera near your router to help separate a Wi-Fi coverage problem from a camera problem.
Why won’t my light bulb camera connect to Wi-Fi?
Check the Wi-Fi password, network band supported by your exact camera, signal strength and setup instructions. Many models require 2.4 GHz, while some newer cameras support both 2.4 and 5 GHz.
Why does my camera work inside but not outside?
The outdoor socket may have weaker Wi-Fi because the signal has to pass through exterior walls, brick, concrete, metal or other obstacles. Test the camera near the router to confirm it works normally.
Why isn’t my light bulb camera recording?
Check whether event or continuous recording is enabled, whether the microSD card is recognized, whether storage is full and whether your cloud plan is active if cloud recording is required.
Why is night vision cloudy or white?
Infrared light may be reflecting from glass, a wall, ceiling, fixture or another nearby surface. A dirty lens, spider web, moisture or condensation can also reduce nighttime image quality.
Why am I getting so many motion alerts?
Motion sensitivity may be too high or the detection area may include trees, traffic, sidewalks or other frequent movement. Adjust sensitivity, detection zones or camera placement.
Should I factory reset my light bulb camera?
Try simpler troubleshooting first. A factory reset is more appropriate when restarting and normal configuration changes have failed or when the manufacturer specifically recommends it.
Will a factory reset delete my recordings?
That depends on the camera and storage method. Do not assume recordings will be preserved. Save important footage and check the manufacturer’s instructions before resetting or formatting storage.
Why won’t my microSD card work?
The card may be incompatible, improperly inserted, corrupted, full or formatted incorrectly. Check the exact capacity, speed and formatting requirements for your camera.
How do I know if my camera is broken or the Wi-Fi is bad?
Move the camera to a compatible socket close to your router. If it becomes reliable there, the original location probably has a Wi-Fi coverage problem. If the same problem continues, investigate the camera, app, router or account.
Final Thoughts
Many light bulb camera problems become easier to solve once you stop treating the camera as a single device.
Think of it as a system:
Power → Wi-Fi → App → Camera → Storage
Start at the beginning and work through one layer at a time.
Confirm that the socket provides reliable power. Then check Wi-Fi. Next verify the app and camera settings. Only troubleshoot storage after you know the camera itself is operating normally.
Most importantly, do not factory reset the camera every time something goes wrong.
A simple socket test, power cycle, Wi-Fi check or test near the router can often tell you much more about the actual cause.
If the same problem continues in multiple known-good locations after following the manufacturer’s troubleshooting steps, it may be time to contact support or consider replacing the camera.