Complete Troubleshooting Guide
A light bulb security camera that refuses to connect to Wi-Fi can be frustrating, especially when the camera appears to power on normally.
The good news is that many connection problems come down to a relatively small number of issues: power, the wrong Wi-Fi band, an incorrect password, weak signal, pairing mode, app permissions, or router configuration.
The key is to troubleshoot these possibilities in a logical order instead of repeatedly resetting the camera or changing random router settings.
This guide walks through that process from the simplest fixes to the less obvious problems.
Because setup procedures vary between manufacturers and models, always use the instructions for your exact camera when performing a reset, changing network settings, or entering pairing mode.
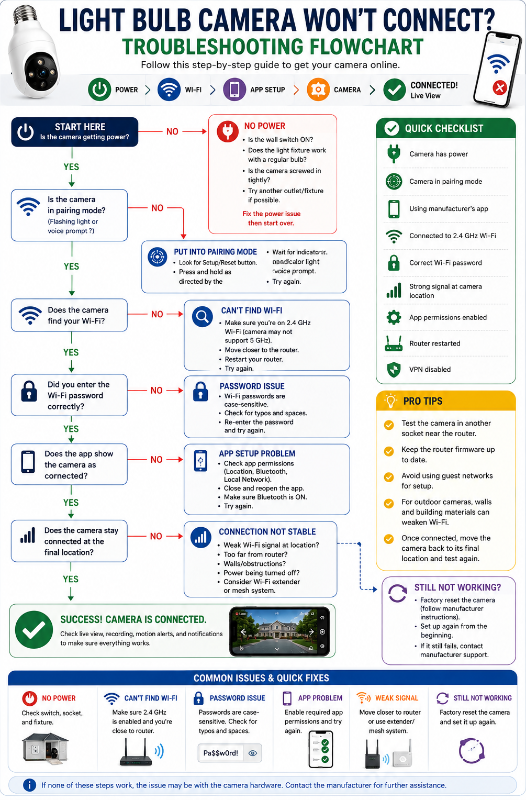
Quick Fix: Check These First
Before changing anything complicated, check these basics:
- Is the camera actually receiving power?
- Is the wall switch ON?
- Is the camera securely screwed into the socket?
- Is the camera in pairing/setup mode?
- Are you using the manufacturer’s correct app?
- Does your camera require 2.4 GHz Wi-Fi?
- Is your phone connected to the correct Wi-Fi network?
- Did you enter the Wi-Fi password correctly?
- Is the camera reasonably close to the router during initial setup?
- Does the app have the permissions it needs?
- Is a VPN interfering with setup?
- Have you restarted the camera and router?
If you’re installing the camera for the first time, you may also want to read our How to Install a Light Bulb Camera guide before continuing.
Common Light Bulb Camera Wi-Fi Problems
| Problem | Check First |
|---|---|
| Camera won’t power on | Socket, wall switch, fixture |
| Camera won’t enter pairing mode | Setup/reset procedure |
| Camera can’t find Wi-Fi | 2.4 GHz, router, signal |
| Password rejected | Network and password |
| QR code won’t scan | Brightness, glare, distance |
| App can’t find camera | Pairing mode, Bluetooth, permissions |
| Connects then goes offline | Wi-Fi signal or power |
| Worked before router change | Camera needs new network information |
| Works near router but not fixture | Weak signal at installation point |
| Outdoor camera disconnects | Distance, exterior walls, interference |
The important part is determining where the setup process is failing.
1. Make Sure the Camera Actually Has Power
Start here.
A camera without reliable power can look like a Wi-Fi problem.
Light bulb cameras receive electricity through the light socket. If that socket is controlled by a wall switch:
Switch ON → camera receives power
Switch OFF → camera goes offline
Check for signs that the camera has powered up:
- Status light
- Voice prompt
- Startup sound
- Camera movement
- Built-in light
- Other startup behaviour described by the manufacturer
If there’s no sign of power, check whether the wall switch is on and whether the camera is properly seated in the socket.
Test the Socket
If you’re uncertain whether the socket works, switch off power before removing the camera and test the fixture appropriately with a known-working bulb.
If the ordinary bulb doesn’t work either, you probably don’t have a camera Wi-Fi problem.
You have a power or fixture problem.
Don’t attempt electrical repairs you’re not qualified to perform.
2. Check Whether Your Camera Requires 2.4 GHz Wi-Fi
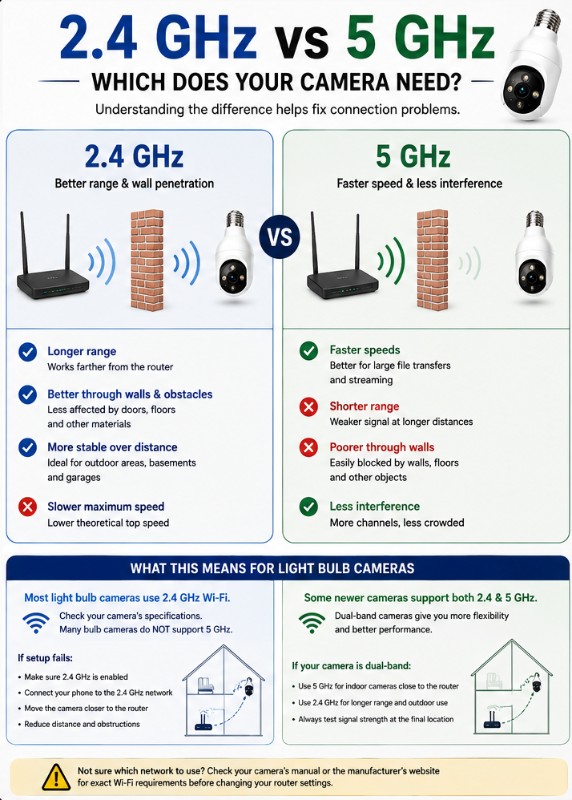
This is one of the first specifications to check when a camera won’t connect.
Many smart cameras use 2.4 GHz Wi-Fi, while some newer models also support 5 GHz.
Don’t assume yours supports both.
For example, Wyze currently states that its Bulb Cam connects to 2.4 GHz Wi-Fi and isn’t compatible with 5 GHz networks.
SYMYNELEC’s requirements vary by model. Its L1 documentation, for example, specifies 2.4 GHz Wi-Fi and says it isn’t compatible with 5 GHz.
This is why you should check the specifications for the exact model, not simply the brand.
What’s the Difference?
In general:
2.4 GHz
- Longer range
- Better ability to pass through walls and other obstacles
- Lower theoretical maximum speed
5 GHz
- Shorter range
- Higher potential speeds
- More affected by distance and obstacles
Security cameras don’t normally require enormous bandwidth, so the range characteristics of 2.4 GHz can be useful.
If Your Camera Is 2.4 GHz Only
Make sure 2.4 GHz Wi-Fi is enabled on your router.
If you see two networks such as:
MyHomeWiFi
and
MyHomeWiFi-5G
choose the 2.4 GHz network during setup when required by your camera.
But modern routers don’t always make the distinction this obvious.
3. What If 2.4 GHz and 5 GHz Have the Same Wi-Fi Name?
Many routers combine both bands under one SSID, or Wi-Fi network name.
For example, you may see only:
HomeWiFi
rather than separate:
HomeWiFi-2.4
HomeWiFi-5
The router decides which band devices use.
This is often convenient, but some smart-home devices can be more difficult to set up on certain network configurations.
Don’t Immediately Reconfigure Your Router
First check the manufacturer’s instructions.
Some cameras work perfectly with a combined network.
Others may have model-specific recommendations.
For example, SYMYNELEC’s L1 instructions recommend splitting the bands when necessary so the camera can connect specifically to the 2.4 GHz network.
If you do separate your Wi-Fi bands temporarily, make sure you understand your router settings before changing them.
4. Make Sure Your Phone Is on the Correct Network
During initial setup, your phone often helps pass network information to the camera.
Check your phone’s Wi-Fi settings.
Make sure you’re connected to the home network you actually want the camera to use.
This becomes particularly important if your phone automatically switches between:
- Home Wi-Fi
- Guest Wi-Fi
- Wi-Fi extender
- Mobile data
- Another saved network
For Wyze Bulb Cam setup, for example, Wyze instructs users to make sure the phone or tablet is connected to the same 2.4 GHz network being entered during setup.
5. Double-Check the Wi-Fi Password
This sounds almost too simple, but check it carefully.
Wi-Fi passwords are typically case-sensitive.
That means:
Camera123
and
camera123
aren’t necessarily the same password.
Watch for:
- Capital letters
- Lowercase letters
- Numbers
- Symbols
- Spaces
- Similar-looking characters
For example:
O vs 0
I vs l vs 1
If the app has an eye icon that reveals the password, use it to confirm exactly what you entered. Wyze specifically recommends this during its Bulb Cam troubleshooting process.
Don’t Trust Autofill Blindly
If your phone automatically inserts a saved password, verify that it’s the current password for that network.
You may have changed the router password since the phone originally stored it.
6. Move the Camera Closer to the Router for Initial Setup
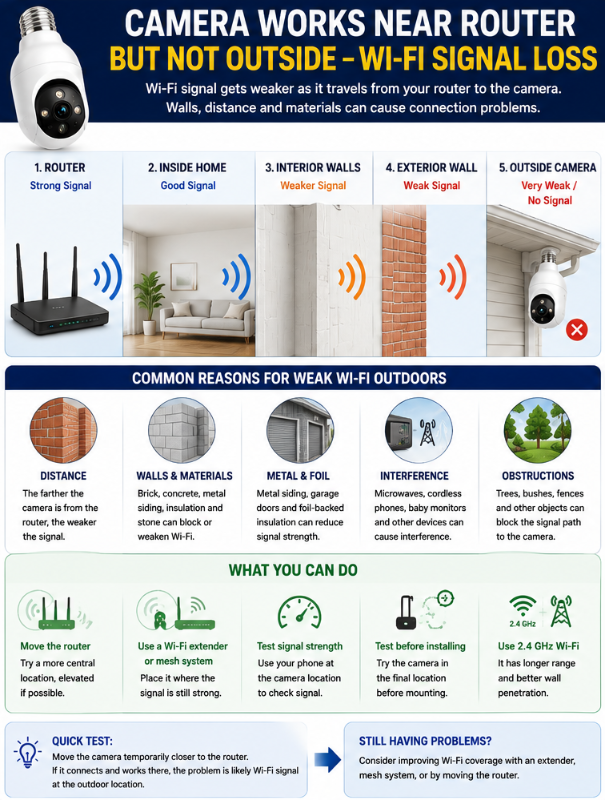
If setup keeps failing, temporarily install the camera in a compatible socket closer to your router.
This is a very useful diagnostic test.
Suppose:
Camera fails in porch socket
↓
Camera connects immediately in socket near router
That tells you something important.
The camera probably isn’t fundamentally incapable of connecting to your Wi-Fi.
The problem may be signal strength at the final installation location.
Wyze also recommends trying its Bulb Cam in another socket closer to the router when setup fails.
Once setup is complete, you can move the camera back to its intended location and test whether it maintains the connection.
7. Make Sure the Camera Is Actually in Pairing Mode
Your phone and router can be configured perfectly and the camera still won’t connect if the camera isn’t ready to pair.
Look for the manufacturer’s pairing indicator.
This might be:
- Flashing light
- Beeping
- Voice prompt
- Specific status-light colour
For example, Wyze Bulb Cam announces that it’s ready to connect and can be placed back into the connection process using its Setup button. The app initially discovers the camera through Bluetooth.
SYMYNELEC’s G12 uses a different process. Its documentation describes a repeating beep while ready for pairing and a QR-code-based Wi-Fi setup.
That’s an important example of why there isn’t one universal “light bulb camera pairing procedure.”
Don’t Randomly Hold the Reset Button
Reset procedures vary.
Holding a button for five seconds might mean something different on another model.
Use the manual or manufacturer’s support documentation for your exact camera.
8. Check Bluetooth and App Permissions
Some cameras use Bluetooth during initial setup even though the camera ultimately communicates through Wi-Fi.
Your camera app may also require certain phone permissions to discover and configure nearby devices.
Depending on the manufacturer, these can include:
- Bluetooth
- Local network access
- Location
- Camera access for QR scanning
- Notifications
For Wyze Bulb Cam, Bluetooth is part of the setup process. Wyze’s troubleshooting instructions also tell users to check Bluetooth and location permissions if setup fails.
The permissions required by your camera may differ.
Use the Correct App
This is especially important with inexpensive marketplace cameras.
Don’t download an app simply because its name or icon looks similar.
Use the app identified in the camera’s legitimate documentation or by the manufacturer.
9. Temporarily Disable a VPN
If you use a VPN on your phone or router, temporarily disabling it during setup may be worth trying.
A VPN can sometimes interfere with the local-network communication used during smart-device setup.
Wyze includes temporarily disabling VPNs among its Bulb Cam setup troubleshooting recommendations.
Once setup is complete, you can restore your normal configuration and test whether the camera continues working.
10. Restart the Camera
Before performing a factory reset, try a simple power cycle.
Turn off power to the camera, wait briefly, and restore power according to the manufacturer’s guidance.
For Wyze Bulb Cam, Wyze recommends switching off the socket for 10 seconds before turning it back on as part of its troubleshooting process.
Allow the camera to completely restart before trying setup again.
Don’t repeatedly flick the wall switch on and off quickly unless the manufacturer specifically instructs you to do so.
Some smart devices use power cycling as part of their reset process.
11. Restart Your Router
If the camera still can’t connect, restart the router.
This can resolve temporary network problems and is considerably less disruptive than changing a collection of advanced settings.
After restarting:
- Wait for the router to fully reconnect.
- Make sure your phone’s Wi-Fi works.
- Confirm you’re connected to the correct network.
- Restart the camera if necessary.
- Try pairing again.
Wyze includes router rebooting among its recommended troubleshooting steps for both initial Bulb Cam setup and connectivity problems.
12. Camera Connects but Immediately Goes Offline
This is a slightly different problem.
If setup completes successfully but the camera later disappears from the app, investigate power and signal strength separately.
Check Power First
Ask:
Did someone turn off the wall switch?
A bulb camera needs continuous electricity.
Also check whether the socket is controlled by:
- Dimmer
- Timer
- Smart switch
- Motion-controlled fixture
- Other automatic control
These can potentially interfere depending on the camera and installation.
Wyze, for example, recommends avoiding a dimmer-controlled socket for its Bulb Cam and checking that the fixture remains physically powered when troubleshooting offline cameras.
Then Check Wi-Fi
If power remains stable, signal strength becomes the next suspect.
Move the camera temporarily closer to the router.
If it becomes reliable, the final installation location may simply have weak coverage.
13. Camera Works Near the Router but Not in the Light Fixture
This is one of the most useful tests you can perform.
If the camera:
Works near router
but
Fails at installation location
you’ve narrowed the problem considerably.
The likely issue is the wireless path between the router and the camera.
Potential obstacles include:
- Distance
- Multiple walls
- Brick
- Concrete
- Metal
- Exterior siding
- Appliances
- Other wireless devices
- Location of the router
Your phone showing Wi-Fi bars at the fixture doesn’t guarantee the camera will have an equally strong connection.
Phones and cameras use different antennas and hardware.
14. Outdoor Light Bulb Camera Wi-Fi Problems
Outdoor cameras can be especially challenging.
The Wi-Fi signal may need to travel:
Router → interior walls → insulation → exterior wall → camera
And the camera may be farther from the router than most of your indoor devices.
Exterior Construction Matters
Brick, concrete, metal siding, foil-backed insulation, and other materials can weaken wireless signals.
This explains why you might have excellent Wi-Fi inside the room directly behind the camera but poor camera connectivity outside.
Test Before Blaming the Camera
Try the camera temporarily:
- In a socket near the router.
- In an indoor socket near the exterior wall.
- At the final outdoor location.
If reliability decreases as you move outward, you have useful evidence that network coverage is contributing to the problem.
For more outdoor-specific considerations, see our Best Light Bulb Cameras for Outdoor Use guide.
15. Should You Use a Wi-Fi Extender?
Possibly, but don’t immediately buy one.
First confirm that weak signal is actually the problem.
If the camera works reliably near the router but not at its final location, improving Wi-Fi coverage may help.
Common approaches include:
Moving the Router
Sometimes even a modest change in router position improves coverage.
Avoid hiding it behind large objects or placing it unnecessarily low if a better location is available.
Wi-Fi Extender
An extender can improve coverage in a weak area, although performance depends on where the extender itself is positioned.
Putting an extender directly inside a dead zone isn’t necessarily useful. It also needs a good connection back to the main network.
Mesh Wi-Fi
Mesh systems use multiple access points to distribute coverage around a home.
This can be particularly useful for larger homes or properties with several weak areas.
But don’t upgrade your entire home network just because one camera failed its initial setup.
Diagnose the problem first.
16. QR Code Won’t Scan
Some light bulb cameras use a QR code during Wi-Fi setup.
Typically, the app displays a QR code containing network information and you hold the phone in front of the camera lens.
If the camera won’t recognize it, try:
- Increase phone-screen brightness
- Clean the camera lens
- Clean the phone screen
- Remove glare
- Keep the QR code fully visible
- Hold the phone steady
- Slowly adjust the distance
- Make sure the camera is actually in QR pairing mode
Don’t press the phone directly against the camera lens.
Give the camera enough distance to focus.
SYMYNELEC’s G12, for example, uses QR-code pairing after the Wi-Fi information has been entered in the app.
17. Camera Worked Until You Changed Your Router
This is extremely common.
Your camera remembers the network information you provided during setup.
If you replace your router or change:
- Wi-Fi network name
- Password
- Network configuration
the camera may no longer be able to connect.
You’ll usually need to update the camera with the new Wi-Fi credentials or set it up again according to the manufacturer’s procedure.
A Useful Trick When Replacing a Router
In some circumstances, configuring a replacement router with the same Wi-Fi name and password as the old network can allow existing smart devices to reconnect without individually reconfiguring everything.
However, this isn’t guaranteed for every device or network configuration.
If the camera doesn’t reconnect, follow its manufacturer’s network-change procedure.
18. Camera Won’t Connect to Guest Wi-Fi
Guest networks can create another problem.
Many routers intentionally isolate devices connected to a guest network.
That can prevent your phone and camera from communicating with each other during setup even though both technically have internet access.
If setup repeatedly fails on a guest network, try your normal home network.
Also avoid public Wi-Fi, hotel Wi-Fi, or networks requiring a browser login page unless the camera manufacturer specifically supports that type of connection.
19. Check for Router Security Compatibility
This is a less common problem, but worth considering after the basics.
Older or inexpensive smart devices may not support every modern router configuration.
Potential compatibility issues can involve:
- WPA3-only security
- Hidden SSIDs
- Enterprise Wi-Fi
- MAC filtering
- Client isolation
- Unusual firewall settings
Don’t weaken your entire network’s security simply to get an inexpensive camera online.
Instead, check the camera manufacturer’s documented network requirements.
If a camera requires outdated or uncomfortable security settings, that may be a reason to reconsider using that particular device.
20. Check Whether the App or Camera Firmware Is Outdated
Software can also cause connectivity problems.
Check whether:
- Camera app has an update
- Camera firmware has an update
- Phone operating system is compatible
- Manufacturer has reported a service issue
Wyze recommends confirming that its app is current when troubleshooting Bulb Cam setup and updating camera firmware when troubleshooting ongoing connectivity.
Firmware updates can address bugs, compatibility, stability, and security issues.
If the camera is already functioning enough to update firmware, consider doing so before performing more drastic troubleshooting.
21. When Should You Factory Reset the Camera?
A factory reset is useful, but it shouldn’t necessarily be Step 1.
Try the simpler fixes first:
Power
↓
Correct network
↓
Password
↓
Signal
↓
Pairing mode
↓
App permissions
↓
Restart camera/router
↓
Factory reset
A reset generally clears network/setup information and requires you to configure the camera again.
The procedure varies by model.
For example, Wyze currently instructs Bulb Cam users to remove an installed microSD card and hold the Setup button for 10 seconds while the camera is powered until the appropriate status-light sequence occurs.
SYMYNELEC documents a different reset procedure for its G12.
Use the procedure for your exact model rather than copying reset instructions from another camera.
22. How to Tell Whether the Problem Is Your Camera or Wi-Fi
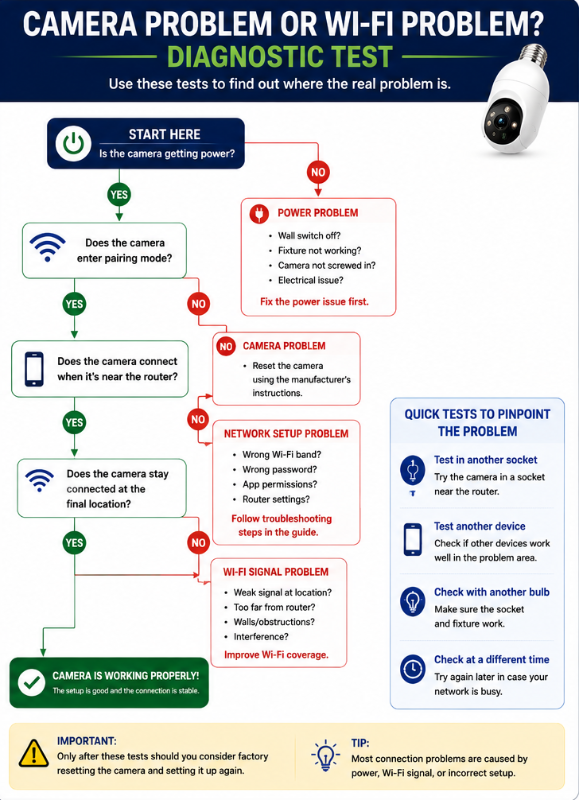
This is where systematic troubleshooting pays off.
Camera Works in Another Socket Near the Router
Likely points toward:
Wi-Fi coverage at the original location.
Camera Has No Power in Multiple Known-Good Sockets
Likely points toward:
Camera hardware/power problem.
Camera Powers Up but Never Enters Pairing Mode After Correct Reset
Possible:
Camera/setup problem.
Multiple Smart Devices Suddenly Lose Connection
More likely:
Router/network/internet problem.
Camera Connects to Another Network
Likely:
Compatibility or configuration problem with your primary network.
Camera Connects but Frequently Drops Offline Only at One Location
Strongly suggests investigating:
Signal strength or power at that location.
This approach is much more useful than repeatedly factory-resetting the camera.
23. When to Contact the Manufacturer
If you’ve gone through the troubleshooting steps and the camera still won’t connect, contact the manufacturer.
Before contacting support, gather:
- Exact camera model
- App name/version
- Phone type
- Router model if known
- Wi-Fi band being used
- Camera status-light colour/pattern
- Error message
- Which troubleshooting steps you’ve already tried
Instead of saying:
“My camera doesn’t work.”
you can tell support:
“The camera powers on and enters pairing mode. My phone is connected to 2.4 GHz Wi-Fi and the password is correct. The camera connects when installed near the router but goes offline in the outdoor fixture.”
That information immediately narrows the problem.
Also check whether the manufacturer has a current service-status page. Sometimes a camera or app problem isn’t inside your home at all.
Light Bulb Camera Wi-Fi Troubleshooting Flowchart
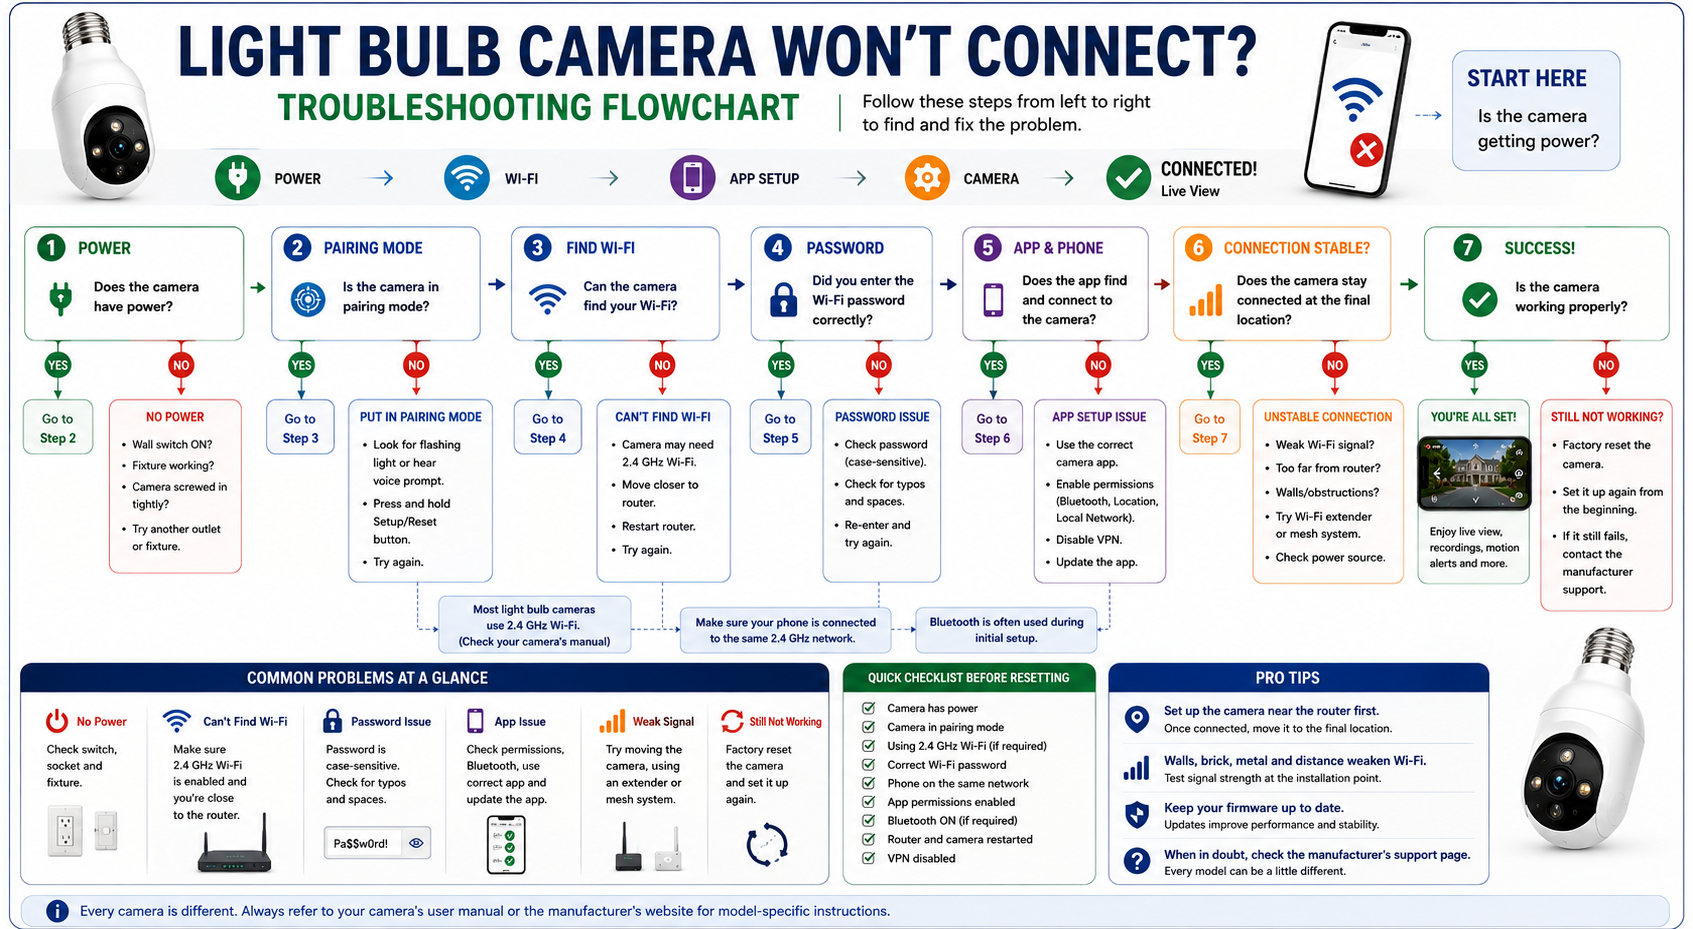
Here’s the process I’d follow:
Does the camera have power?
NO → Check switch, socket and fixture.
YES ↓
Is the camera in pairing mode?
NO → Follow the model-specific Setup/Reset procedure.
YES ↓
Does the camera support your Wi-Fi band?
NO → Connect to a supported network.
YES ↓
Is the Wi-Fi password definitely correct?
NO → Correct password and retry.
YES ↓
Is the camera close enough to the router?
NOT SURE → Test in a socket near the router.
YES ↓
Does the app have the required permissions?
NO → Enable the manufacturer’s required permissions.
YES ↓
Restart camera and router.
Still won’t connect?
↓
Check router compatibility/settings.
Still won’t connect?
↓
Follow the manufacturer’s factory-reset procedure.
Still won’t connect?
↓
Contact manufacturer support.
This order minimizes unnecessary changes and helps identify what’s actually failing.
Frequently Asked Questions
Why won’t my light bulb camera connect to Wi-Fi?
Common causes include no power, an unsupported Wi-Fi band, incorrect password, weak signal, camera not being in pairing mode, missing app permissions, or network/router configuration.
Start with power and basic network compatibility before changing advanced settings.
Do light bulb cameras need 2.4 GHz Wi-Fi?
Many do, but not all.
Check your exact model. Don’t assume every light bulb camera has identical network requirements.
Why won’t my camera connect to 5 GHz Wi-Fi?
The camera may simply not support 5 GHz.
For example, Wyze currently specifies 2.4 GHz Wi-Fi for its Bulb Cam.
If your camera is 2.4 GHz only, make sure your router provides a compatible 2.4 GHz network.
Can my phone be on 5 GHz while the camera is on 2.4 GHz?
After setup, devices on different bands can often communicate when they’re part of the same properly configured local network.
Initial setup can be more particular, however.
Follow your camera manufacturer’s instructions. Some specifically require the phone to be connected to the 2.4 GHz network during setup.
Why does my bulb camera keep going offline?
Check two things first:
Power and Wi-Fi signal.
Make sure nobody is turning off the wall switch and that the camera maintains a strong enough Wi-Fi connection at the fixture.
Why does my camera work near the router but not outside?
That’s a strong sign that Wi-Fi coverage may be inadequate at the outdoor location.
Exterior walls, distance, brick, concrete, metal and other obstacles can weaken the signal.
Will a Wi-Fi extender help my security camera?
It may help if weak coverage is actually causing the problem.
Test the camera near the router first. If it works there but fails at the installation location, improving network coverage becomes a reasonable next step.
Should I reset my camera if it won’t connect?
A factory reset can help, but I’d try basic troubleshooting first.
Check power, Wi-Fi band, password, signal, pairing mode, app permissions, and restart the camera/router before resetting.
If you do reset it, follow the procedure for your exact camera model.
Why won’t the camera scan the QR code?
Make sure the lens and phone screen are clean, increase screen brightness, reduce glare, keep the entire QR code visible, and slowly adjust the distance between the phone and camera.
Also confirm the camera is actually in QR pairing mode.
Why did my camera stop working after I changed my Wi-Fi password?
The camera may still be trying to connect using the old password.
You’ll normally need to update its network information or set the camera up again according to the manufacturer’s instructions.
Final Thoughts
When a light bulb camera won’t connect to Wi-Fi, resist the temptation to immediately factory reset everything.
Troubleshoot in order:
Power → Pairing → Wi-Fi band → Network → Password → Signal → App permissions → Restart → Router settings → Factory reset
That order matters.
If the camera has no power, changing Wi-Fi settings won’t help.
If the camera only supports 2.4 GHz, repeatedly entering the password for an incompatible 5 GHz network won’t help.
And if the camera works perfectly beside the router but disconnects at the outdoor fixture, repeatedly resetting the camera probably won’t solve the underlying signal problem.
The goal is to identify which part of the connection is failing.
Once you know whether the problem involves the camera, power, Wi-Fi, app, or installation location, fixing it becomes much easier.