Choosing the right location for a light bulb security camera can make as much difference as choosing the camera itself.
A camera may advertise a wide field of view, pan-and-tilt coverage, night vision, motion detection, and high-resolution video, but those features won’t help much if the camera is positioned too high, pointed at a wall, blocked by the light fixture, or struggling with weak Wi-Fi.
The goal isn’t simply to place the camera as high as possible.
You want a location that provides a useful view of the area you actually want to monitor, while also considering power, Wi-Fi, nighttime performance, weather exposure, and privacy.
This guide explains how to find that location.
Jump to:
Where to Install a Light Bulb Camera: Best Placement Guide for 2026
A good location usually combines six things:
- A clear view of the area you want to monitor
- An angle that can capture useful details
- A compatible socket with continuous power
- Reliable Wi-Fi
- Appropriate weather protection for outdoor installations
- A field of view that respects other people’s privacy
Don’t evaluate any one of these by itself.
A socket above your front door might provide excellent Wi-Fi and continuous power, for example, but be a poor choice if the fixture blocks half the camera’s view.
Similarly, a camera may have a perfect view of your driveway but disconnect repeatedly because it’s too far from the router.
Think of placement as:
View + Angle + Power + Wi-Fi + Environment + Privacy
rather than simply:
Where do I have a light socket?
Start With What You Actually Want to See
Before installing the camera, decide what you’re trying to monitor.
This sounds obvious, but it changes how the camera should be positioned.
Are you primarily trying to see:
- Someone approaching your front door?
- Packages left on a porch?
- People entering a driveway?
- Vehicles parked outside?
- A garage entrance?
- A backyard gate?
- An indoor entrance?
- A general room?
Don’t automatically try to capture the largest possible area.
A huge field of view isn’t necessarily a useful field of view.
If the purpose is seeing people approaching your front door, getting a reasonably useful view of that approach may matter more than seeing your entire front yard.
Likewise, if you’re watching a driveway, filling half the image with sky or the side of your house isn’t particularly helpful.
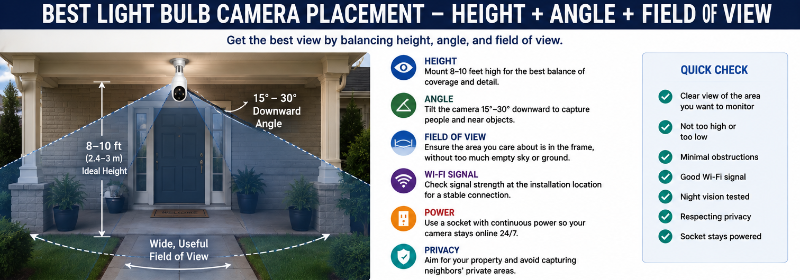
How High Should a Light Bulb Camera Be?
There isn’t one perfect height for every light bulb camera.
Unlike a conventional security camera, your installation height is largely determined by the location of the existing light socket.
That creates both an advantage and a limitation.
You don’t necessarily need to drill holes or run power, but you also don’t get complete freedom over mounting height.
Higher Isn’t Always Better
It can be tempting to assume:
Higher camera = better security
But that’s too simplistic.
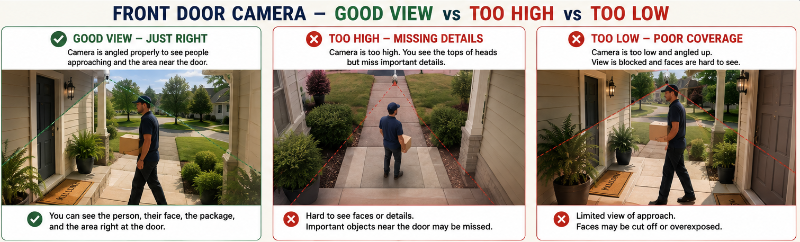
As the camera gets higher, its viewing angle usually becomes steeper.
That can produce excellent coverage of an area while making it harder to see useful details of people closer to the camera.
For example, a camera mounted very high and pointed sharply downward may capture:
- Tops of heads
- Shoulders
- Large amounts of ground
instead of a more useful view of someone approaching.
The best height is therefore the one that provides the view you need from the socket that’s safely and practically available.
Camera Angle Can Matter as Much as Height
Two cameras installed at exactly the same height can produce very different footage depending on their angle.
Imagine a camera mounted above a porch.
Camera A
Points almost straight down.
It captures the porch floor extremely well but provides a limited view of someone approaching.
Camera B
Points outward at a shallower angle.
It captures more of the approach but may miss the area immediately beneath the camera.
Neither is automatically correct.
The question is:
What do you need to see?
For many entrances, a balanced angle that captures both the approach and the immediate entrance area will be more useful than either extreme.
Use Live View Instead of Guessing
One advantage of Wi-Fi cameras is that you can see the image on your phone while adjusting the camera.
Use that.
After connecting the camera, open Live View and examine the entire frame.
Look at:
Top: Are you wasting a large portion of the image on sky or ceiling?
Bottom: Can you see the important area close to the camera?
Left and right: Are walls, fixture edges, or other objects wasting part of the frame?
Centre: Is the area you’re actually interested in positioned appropriately?
A camera can look perfectly positioned when you’re standing underneath it and still produce a poor image.
The app shows you what actually matters: what the camera sees.
For the complete setup process, see our How to Install a Light Bulb Camera guide.
Best Light Bulb Camera Position for a Front Door
For a front entrance, start by identifying the route visitors normally take.
Do they:
- Walk straight toward the door?
- Approach from the left or right?
- Come up stairs?
- Enter through a porch?
- Walk from a driveway?
Then position the camera so that its useful viewing area covers that approach.
Try to Avoid an Extremely Steep Angle
If the socket is directly above the door, check whether the camera can angle outward enough to capture people before they’re standing directly beneath it.
A motorized pan-and-tilt model may give you more flexibility, while a wide fixed-view camera can work well when one stable angle already covers the entrance.
Check the Area Directly at the Door
If package monitoring matters, make sure you can see where deliveries are normally placed.
A view that’s excellent for seeing approaching visitors might still have a blind spot directly beneath the camera.
Test With an Actual Person
Don’t just look at an empty porch.
Have someone:
- Walk toward the door.
- Stop where a visitor normally stands.
- Bend down as if leaving a package.
- Walk away.
Watch the Live View or recording afterward.
That’s much more informative than deciding the position based on an empty image.
Best Light Bulb Camera Position for a Porch
Porches can be excellent locations for bulb cameras because they often already have lighting fixtures and some weather protection.
But they can also create obstructions.
Watch for:
- Porch posts
- Railings
- Roof edges
- Hanging plants
- Decorations
- Light-fixture housings
- Walls close to the camera
A post that occupies only a small part of the image might not seem important during the day but could create additional problems at night if infrared illumination reflects from it.
Covered Doesn’t Automatically Mean Perfect
A covered porch may help protect the camera from direct weather, but the overhang can potentially block part of the camera’s view or affect nighttime performance.
Always test the actual image.
Best Light Bulb Camera Position for a Driveway
For a driveway, decide whether you’re primarily interested in:
- General activity
- Vehicles entering
- Vehicles parked
- People walking toward the house
- Garage entrance
A wide overview can be useful, but don’t automatically try to include the entire street.
If most activity you’re interested in occurs on your property, position the camera accordingly.
Don’t Waste the Frame
If the top half of the image is sky, you may be wasting useful pixels.
Likewise, pointing too far downward could give you an excellent picture of pavement while missing the approach to the property.
Use the camera’s actual Live View to find a useful balance.
Be Realistic About Vehicle Details
Seeing that a vehicle entered the driveway is different from reliably identifying a licence plate.
Distance, motion, lighting, camera resolution, shutter behaviour, angle, glare, and nighttime conditions can all affect detail.
Don’t assume a general-purpose bulb camera will perform like a dedicated licence-plate camera simply because the driveway is visible.
Best Position for a Garage
There are two common scenarios:
Camera Outside the Garage
This can provide a view of:
- Driveway
- Garage door
- Vehicles
- People approaching
Check whether the garage itself creates a large blind spot.
Camera Inside the Garage
A bulb camera installed in an existing ceiling socket may provide a broad overview of the interior.
However, think about whether the socket stays powered when the garage lights are switched off.
If turning off the garage light removes electricity from the socket, the camera will go offline too.
That’s one of the issues explained in our guide to whether light bulb cameras work when the light is off.
Best Position for a Backyard
Backyards can be challenging because there may be several areas you want to see:
- Patio
- Back entrance
- Gate
- Shed
- Pool
- Yard
- Walkway
Trying to capture everything with one camera can result in a view that’s too broad to be particularly useful.
Start by prioritizing the area that matters most.
For example, if the primary purpose is monitoring the back entrance, orienting the camera around that entrance may be more useful than maximizing coverage of the entire yard.
Consider Privacy Carefully
Backyard cameras can easily capture neighbouring yards, windows, decks, or other private spaces.
Aim the camera around your actual monitoring purpose rather than simply maximizing how far it can see.
Canada’s Office of the Privacy Commissioner advises people to remain aware of where connected cameras are pointing and cautions against taking them into especially sensitive areas such as bedrooms and bathrooms. More broadly, Canadian privacy guidance emphasizes minimizing unnecessary surveillance and avoiding areas where people have a heightened expectation of privacy.
Best Indoor Locations
Light bulb cameras aren’t limited to outdoor use.
An indoor ceiling fixture can potentially provide a wide overview of:
- Entrance
- Hallway
- Living area
- Garage
- Basement
- Workshop
But indoor placement deserves extra privacy consideration.
Avoid Highly Private Spaces
I would generally avoid placing internet-connected security cameras in areas such as bathrooms and bedrooms.
The Office of the Privacy Commissioner of Canada specifically recommends against taking web-connected cameras into especially sensitive areas such as bedrooms or bathrooms.
Think About What the Camera Can Hear Too
If the camera includes a microphone, placement isn’t only about video.
Consider what conversations and other audio could potentially be captured.
Privacy laws and recording requirements vary by location and circumstances, so don’t assume that because you own the camera, every possible recording use is automatically appropriate.
Pan-and-Tilt vs Fixed Camera Placement
Camera design should influence placement. A wide fixed-view camera such as Wyze Bulb Cam needs a strong viewing angle from the start, while a motorized model such as current SYMYNELEC P4 versions gives you more freedom to look around after installation.
Neither approach is automatically better. The right choice depends on whether one fixed view already covers the area or whether you genuinely need to change directions remotely.
Pan-and-tilt cameras provide more flexibility, but they don’t eliminate the need for good placement. Current bulb cameras use both approaches: some models offer remote motorized pan-and-tilt, while others use a wide fixed view that you position during installation.
Fixed Camera
With a fixed camera, your installation angle determines the viewing area.
Once installed, you can’t remotely rotate the lens toward something outside that view.
Positioning is therefore particularly important.
Pan-and-Tilt Camera
A pan-and-tilt camera can look in different directions.
That can be useful for:
- Wider areas
- Driveways
- Yards
- Large rooms
But remember:
Being able to rotate 360 degrees doesn’t mean the camera sees everything simultaneously.
The lens still sees only its current field of view.
Check the Entire Movement Range
Use the app to rotate the camera through its available range.
Look for:
- Fixture interference
- Walls
- Roof edges
- Other obstructions
- Areas you don’t want the camera viewing
If the fixture blocks the camera when it turns in one direction, you may not have as much usable coverage as the specifications suggest.
Watch for Light Fixture Obstructions
This is especially important with light bulb cameras.
They’re designed to use existing light sockets, but existing fixtures were originally designed around light bulbs, not necessarily cameras.
The fixture could block:
- Lens
- Pan-and-tilt movement
- Infrared illumination
- Built-in light
- Wi-Fi signal
- Microphone or speaker
Decorative glass and enclosed fixtures deserve particular attention.
Before purchasing, compare the camera’s physical dimensions with the fixture.
Our How to Choose the Right Light Bulb Camera guide covers compatibility checks in more detail.
Night Vision Can Change Which Location Is Best
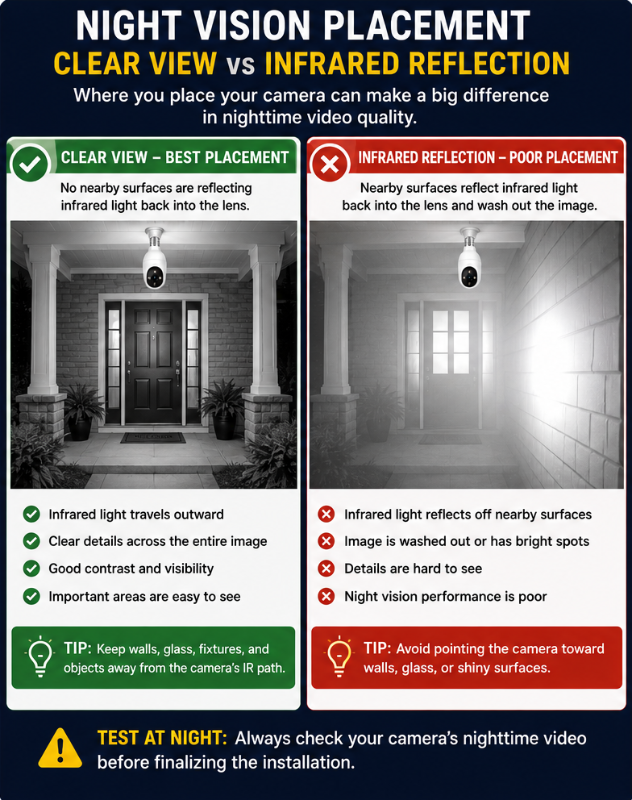
Don’t finalize the installation based only on daytime video.
Check it again after dark.
Infrared night vision introduces another potential problem: reflection.
Nearby objects can reflect infrared illumination back toward the camera.
Potential trouble spots include:
- Glass
- Walls
- Roof overhangs
- Fixture edges
- Shiny surfaces
- Window screens
- Objects very close to the lens
The result can be a bright, washed-out area that makes the rest of the nighttime image harder to see.
A Small Position Change Can Make a Big Difference
If nighttime footage looks poor, try adjusting the camera angle.
Sometimes moving a reflective surface toward the edge of the frame or away from the infrared illumination can significantly improve the image.
Compare:
Daytime view
and
Nighttime view
before deciding the position is finished.
Bright Lights Can Also Affect the View
Infrared isn’t the only lighting consideration.
A bright porch light, streetlight, vehicle headlights, or other illumination can affect the image.
Look for:
- Glare
- Overexposed areas
- Deep shadows
- Reflections
- Rapid changes between bright and dark areas
Again, test under the conditions in which you’ll actually use the camera.
A position that looks excellent at 2 p.m. may behave very differently at 11 p.m.
Check Wi-Fi at the Actual Camera Location
A great camera angle isn’t useful if the camera constantly disconnects.
Wi-Fi signal can be weakened by:
- Distance
- Multiple walls
- Brick
- Concrete
- Metal
- Exterior construction
- Other obstacles
Outdoor installations can be particularly challenging because the signal has to travel from the router through the home’s exterior.
Test the Camera Where You’re Actually Going to Use It
Don’t assume that because setup works in your kitchen, the camera will work reliably outside above the garage.
Install it at the intended location and test:
- Live View
- Playback
- Notifications
- Response time
- Pan-and-tilt controls
- Connection stability
If the camera works beside the router but repeatedly disconnects at its final location, our Light Bulb Camera Not Connecting to Wi-Fi guide explains how to isolate signal and network problems.
Make Sure the Socket Can Stay Powered
This is another location requirement that’s easy to overlook.
The perfect socket isn’t useful if household members regularly turn it off.
A light bulb camera normally needs continuous electricity to remain available.
The camera’s visible light can often be controlled separately through its app, but the socket itself still needs power.
If the fixture uses:
- Regular wall switch
- Dimmer
- Timer
- Motion-controlled power
- Smart switch
check whether that arrangement is appropriate for your particular camera.
A camera that loses electricity whenever someone turns off the porch light won’t provide continuous monitoring.
Outdoor Placement: Covered vs Fully Exposed
If the camera is going outside, don’t choose its location based solely on the view.
Check the manufacturer’s environmental requirements.
Consider:
- Weather rating
- Rain exposure
- Snow
- Temperature
- Humidity
- Socket protection
- Fixture suitability
- Installation orientation
A weather-resistant camera body doesn’t automatically make every socket and electrical connection appropriate for direct weather exposure.
For more on this, see our Best Light Bulb Cameras for Outdoor Use guide.
Privacy Should Be Part of Camera Positioning
The technically widest view isn’t necessarily the best view.
Look at the edges of the image.
Is the camera unnecessarily capturing:
- Neighbouring windows?
- Neighbour’s backyard?
- Another apartment?
- Private entrances?
- Areas completely unrelated to your security purpose?
If so, repositioning the camera or using privacy masking may produce a more appropriate field of view.
Canadian privacy guidance emphasizes limiting surveillance to what’s actually necessary. In a past apartment-building case, Canada’s Privacy Commissioner recommended repositioning exterior cameras so they captured only what was needed for the stated security purpose and avoided unnecessary collection involving other people.
For a deeper look at these considerations, see our Privacy-First Light Bulb Camera Buyer Checklist.
You should also review our Where NOT to Install a Light Bulb Camera guide before finalizing an installation.
Don’t Forget Motion Detection Zones
The camera’s full viewing area and its useful motion-detection area don’t necessarily need to be identical.
For example, your driveway camera might see:
Driveway + sidewalk + street
but you may primarily want alerts from:
Driveway
If the camera supports customizable detection zones, configure them after you’ve finalized the physical position.
This can potentially reduce unnecessary alerts caused by:
- Passing vehicles
- Pedestrians
- Trees
- Neighbouring activity
- Other movement outside the area you care about
Start with sensible settings and adjust them based on real-world use.
Test the Position With Real Activity
This is one of the most important steps.
Don’t judge placement from a static image.
Have someone move through the area exactly as a real visitor would.
For a Front Door
Walk toward the entrance, stand at the door, leave a package, and walk away.
For a Driveway
Walk up the driveway and, if appropriate, test with a vehicle.
For a Backyard
Walk through the gate and toward the house.
For an Indoor Camera
Walk through the entrance and across the monitored area.
Then review the footage.
Ask:
Could I actually see what happened?
That’s more important than whether the camera technically covered the area.
Test During the Day and at Night
A complete placement test should include:
Daytime
- Overall image
- Faces/details
- Shadows
- Bright sunlight
- Field of view
Nighttime
- Infrared performance
- Visible lighting
- Reflections
- Glare
- Dark areas
Motion
- Detection
- Notifications
- Tracking if available
- Recording start
Wi-Fi
- Live View reliability
- Playback
- Connection stability
You may discover that the location needs a slight adjustment after seeing actual recordings.
Common Light Bulb Camera Placement Mistakes
A few problems show up repeatedly.
Mounting Too High
A very steep angle can reduce useful detail.
Pointing Too Far Down
You may capture plenty of ground but not enough of the approach.
Pointing Too High
You may waste a significant portion of the frame on sky or ceiling.
Ignoring the Fixture
The fixture itself may obstruct the camera.
Testing Only During Daylight
Nighttime reflections or glare may reveal problems you didn’t see during the day.
Ignoring Wi-Fi
Excellent view, terrible connection.
Ignoring Continuous Power
Someone flips the switch and the camera disappears.
Trying to See Everything
An extremely wide view isn’t necessarily useful.
Ignoring Privacy
Capturing more than you need can create unnecessary privacy concerns.
Our Where NOT to Install a Light Bulb Camera guide goes deeper into placement mistakes.
Light Bulb Camera Placement Checklist
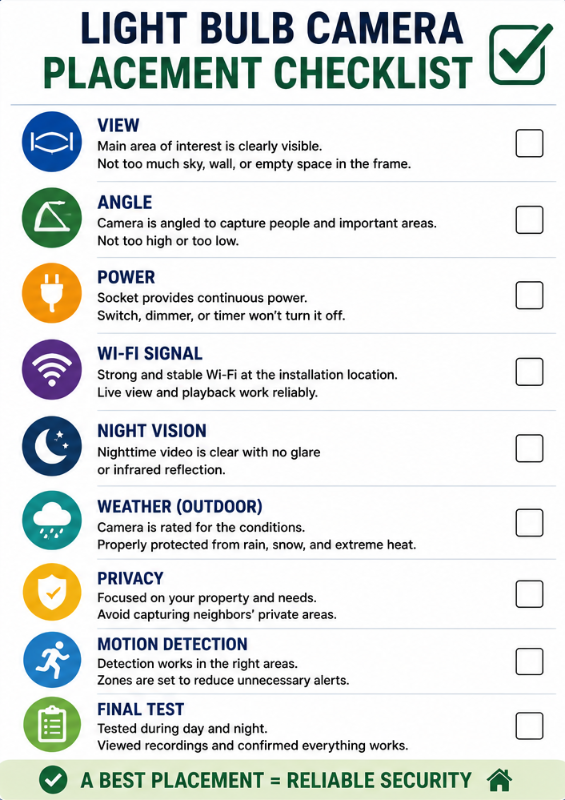
Before calling the installation finished, check the following.
View
☐ Main area of interest is clearly visible
☐ Camera isn’t wasting excessive space on sky, ceiling, walls, or ground
☐ Important approach routes are visible
☐ Fixture doesn’t obstruct the lens
Angle
☐ Camera isn’t pointed excessively downward
☐ People can be seen from a useful angle
☐ Important areas aren’t hidden directly beneath the camera
☐ Pan-and-tilt movement isn’t obstructed
Power
☐ Socket can remain continuously powered
☐ Household members know the switch should remain on
☐ Fixture controls are compatible with the camera
Wi-Fi
☐ Camera connects reliably at its final location
☐ Live View loads consistently
☐ Recordings can be accessed
☐ Camera doesn’t repeatedly go offline
Nighttime
☐ Night vision has been tested
☐ No major infrared reflections
☐ Nearby lights don’t ruin the image
☐ Important areas remain visible after dark
Outdoor Installation
☐ Camera is rated appropriately for the location
☐ Fixture/socket arrangement is suitable
☐ Weather exposure has been considered
Privacy
☐ Camera is primarily aimed at the area you actually need to monitor
☐ Neighbouring private areas aren’t unnecessarily captured
☐ Privacy zones are configured if appropriate
Final Testing
☐ Someone has walked through the monitored area
☐ Motion detection works
☐ Notifications work
☐ Test recordings have been reviewed
☐ Day and night footage have both been checked
Frequently Asked Questions
Where is the best place to install a light bulb camera?
The best location provides a useful view of the area you want to monitor while also offering continuous power, reliable Wi-Fi, appropriate weather protection, and a reasonable camera angle.
There isn’t one ideal location for every home.
How high should a light bulb security camera be?
There isn’t one universal height because bulb cameras depend on existing light-socket locations.
Instead of focusing on a specific number, check whether the camera angle provides useful footage of the people or areas you’re trying to monitor.
Should a security camera point down?
A slight downward angle can be useful from an elevated location, but an excessively steep angle may capture mostly the tops of people’s heads and the ground.
Use Live View to evaluate the actual result.
Where should I put a light bulb camera at my front door?
Choose a compatible socket that gives the camera a clear view of the normal approach to the entrance and the area immediately around the door.
Test the view with someone actually approaching the entrance.
Where should I put a light bulb camera for a driveway?
Look for a location that provides useful coverage of the driveway and the activity you’re interested in without unnecessarily filling the frame with sky, walls, or unrelated public areas.
Can a light fixture block a bulb camera?
Yes.
Fixture walls, glass, trim, shades, and other components can obstruct the lens, limit pan-and-tilt movement, or contribute to nighttime reflections.
Check physical clearance before installation.
Should I point my camera at the street?
Your camera may naturally capture some street area depending on the property and installation, but you shouldn’t automatically maximize surveillance beyond what you reasonably need.
Consider privacy and focus the camera on its intended security purpose.
Can a light bulb camera point toward my neighbour’s property?
Be careful about unnecessarily capturing neighbouring windows, yards, entrances, or other private areas.
Camera and privacy laws vary by jurisdiction and circumstances. Where possible, position the camera around your own monitoring purpose and use privacy zones when appropriate.
Why does my camera look good during the day but terrible at night?
Infrared reflections, nearby surfaces, glass, bright lights, or other environmental conditions can affect nighttime footage.
Test the camera after dark and adjust its angle if necessary.
Why does my camera work inside but disconnect outside?
Wi-Fi signal may be weakened by distance and exterior construction.
Test the camera closer to the router. If it becomes reliable, investigate Wi-Fi coverage at the outdoor installation location.
Should I use a pan-and-tilt or fixed camera?
Pan-and-tilt can provide more viewing flexibility, while a fixed camera keeps its lens aimed at a consistent area.
Which is better depends on what you’re monitoring.
For a larger comparison of camera formats, see our Light Bulb Camera vs Ring vs Wyze vs Blink guide.
The Simple Placement Rule
Don’t choose the location that lets the camera see the most.
Choose the location that lets it see what matters.
A useful installation combines:
Clear view + useful angle + continuous power + reliable Wi-Fi + good nighttime performance + responsible privacy
If one of those is missing, a different socket or camera position may provide better results.
Final Thoughts
Finding the best location for a light bulb camera involves more than finding an empty light socket.
Start by deciding exactly what you want the camera to monitor.
Then use Live View to evaluate the height, angle, field of view, fixture clearance, and potential blind spots.
Test the camera with real movement rather than an empty scene. Check it during both the day and night. Confirm Wi-Fi reliability at the final location and make sure the socket can remain continuously powered.
Finally, look beyond your own property in the camera image. Internet-connected cameras can collect significant amounts of personal information, so placement should take privacy into account as well. Canada’s Privacy Commissioner recommends being aware of where connected cameras are pointing and taking steps to secure them against unauthorized access.
A camera doesn’t need to see everything.
It needs a reliable, useful view of the area you actually installed it to monitor.