Step-by-Step Setup Guide
Light bulb security cameras are popular partly because installation can be much simpler than installing a traditional wired security camera.
Instead of mounting a separate camera and running a new power cable, many bulb cameras screw into a compatible light socket and receive power from the existing fixture.
But screwing in the camera is only the first part of the setup.
You still need to connect it to Wi-Fi, install the correct app, position the camera, configure recording, adjust motion detection, and make sure the socket remains powered.
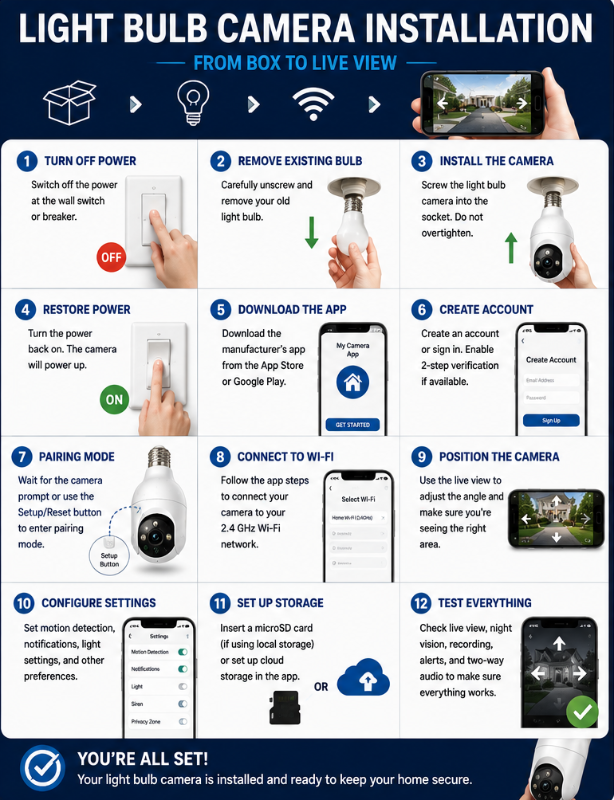
This guide walks through the entire process from opening the box to viewing your first live video feed.
Because setup procedures vary between manufacturers and models, always follow the instructions supplied with your particular camera when they differ from the general steps below.
Before You Start: Make Sure the Location Will Work
It’s much easier to check compatibility before installing the camera than to discover a problem halfway through setup.
Before removing your existing bulb, check four things.
1. Socket Compatibility
Determine which socket type the camera requires.
Many North American bulb cameras use the common E26 screw-in socket, but don’t assume every model does.
For example, Wyze specifies a standard E26 socket for its Bulb Cam.
2. Fixture Clearance
Light bulb cameras are considerably larger than ordinary light bulbs.
Make sure there is enough room for:
- The camera body
- The lens
- Any pan-and-tilt movement
- Manual positioning
- Ventilation required by the manufacturer
Also check whether the fixture will obstruct the camera’s view.
Some models aren’t intended for enclosed fixtures. Wyze, for example, specifically says its Bulb Cam should not be used in a totally enclosed luminaire.
3. Continuous Power
A bulb camera needs electricity even when you don’t want its light illuminated.
If the socket is controlled by a wall switch:
Switch ON → Camera powered
Switch OFF → Camera offline
Most bulb cameras allow their built-in lighting to be controlled independently through the app while the physical socket remains powered.
Make sure that’s practical for your household before installing the camera.
4. Wi-Fi
Take your phone to the installation location and check that your Wi-Fi signal is reasonably strong.
This is particularly important for cameras installed:
- Outside
- On a porch
- In a garage
- Several rooms from the router
- On another floor
- Behind brick, concrete, or exterior walls
Also check which Wi-Fi bands your exact camera supports.
Some bulb cameras support only 2.4 GHz, while others support both 2.4 and 5 GHz.
Don’t assume based on appearance or brand alone. Even products from the same manufacturer can have different network requirements.
For more help choosing a compatible camera before installation, see our How to Choose the Right Light Bulb Camera guide.
What You’ll Need
For most installations, you won’t need many tools.
Have these ready:
- Light bulb security camera
- Compatible light socket
- Smartphone or tablet
- Home Wi-Fi network
- Wi-Fi password
- Manufacturer’s camera app
- Camera instructions or QR code
- microSD card, if you’re using local storage
- A safe means of reaching the fixture, if necessary
You may also need access to your router settings if the camera has trouble connecting to your network.
Safety note: Don’t improvise electrical modifications to make an incompatible fixture work. If the socket, wiring, fixture, or installation appears damaged or you’re uncertain about its electrical safety, stop and have it checked by a qualified electrician.
Step 1: Turn Off Power Before Removing the Existing Bulb
Before touching the existing bulb or installing the camera, switch off power to the fixture.
Depending on the installation and manufacturer’s instructions, this may mean using the wall switch or shutting off the appropriate circuit.
Wyze, for example, instructs Bulb Cam users to shut off power to the existing light fixture before removing the bulb and installing the camera.
Also remember that the existing bulb may be hot.
If it has recently been illuminated, give it time to cool before removing it.
Step 2: Remove the Existing Bulb and Inspect the Fixture
Carefully unscrew the existing light bulb.
Before installing the camera, take a moment to look at the fixture.
Watch for obvious problems such as:
- Loose socket
- Cracked components
- Corrosion
- Water intrusion
- Burn marks
- Damaged wiring
- Unusual discoloration
If something doesn’t look right, don’t simply screw a smart camera into it and hope for the best.
A bulb camera is heavier and more complex than an ordinary light bulb. It should be installed only in a suitable fixture in good condition.
Step 3: Install the Light Bulb Camera
With power still off, carefully screw the camera into the compatible socket.
It should be secure, but don’t force or overtighten it.
The exact installation procedure varies by model.
Some cameras allow significant adjustment after installation. Others need to be oriented in a particular direction.
If your camera has a separate socket extender or adapter, use only accessories approved or specified for the product and follow the manufacturer’s instructions.
Check the Lens
Before restoring power, look at where the camera lens sits.
Make sure it isn’t:
- Facing directly into a wall
- Hidden behind the fixture
- Pressed against glass
- Obstructed by decorative trim
- Positioned where pan-and-tilt movement is restricted
You can fine-tune the view later, but obvious positioning problems are easier to fix now.
Step 4: Restore Power
Turn the fixture’s power back on.
The camera should begin its startup sequence.
Depending on the model, you may see:
- Status lights
- LEDs
- Camera movement
- An audible tone
- A voice prompt
Give the camera time to start.
If nothing happens, don’t immediately assume the camera is defective.
First check whether:
- The wall switch is on
- The fixture has power
- The camera is properly seated in the socket
- Another switch controls the fixture
Once the camera is operating, leave the socket powered.
Step 5: Download the Correct Manufacturer App
This is an important step, particularly with unfamiliar marketplace cameras.
Use the app specified by the manufacturer in its documentation or official setup instructions.
Avoid downloading an app merely because its name or icon looks similar.
When possible, verify the app through:
- Manufacturer documentation
- Official manufacturer website
- QR code in the legitimate product documentation
- Apple App Store or Google Play listing
You’ll normally need to create an account.
Use a strong, unique password, and enable two-factor authentication if the manufacturer provides it.
The app is effectively part of the security system, so account security matters.
Step 6: Put the Camera Into Pairing Mode
Many bulb cameras automatically enter pairing mode the first time they’re powered.
You may hear a prompt or see a flashing indicator.
If the camera doesn’t enter pairing mode, you may need to press a Setup or Reset button.
Follow your model’s instructions because the required procedure varies.
For example, Wyze says its Bulb Cam should announce that it is ready to connect; if it doesn’t, pressing the Setup button can restart the connection process. The app then discovers the Bulb Cam using Bluetooth before completing network setup.
SYMYNELEC procedures differ by model. For its G12, for example, the company documents a QR-code pairing process and says holding the reset button for about eight seconds can reset the camera when it isn’t entering the expected pairing state.
Don’t assume the reset procedure from one camera applies to another.
Use the instructions for your exact model.
Step 7: Connect the Camera to Wi-Fi
The manufacturer’s app should guide you through network setup.
Typically you’ll:
- Select Add Device or similar.
- Select your camera model.
- Confirm the camera is in pairing mode.
- Select your Wi-Fi network.
- Enter the Wi-Fi password.
- Follow the app’s connection procedure.
- Wait for confirmation that setup is complete.
Some cameras use Bluetooth during initial setup. Others display a QR code on your phone that the camera scans. Some manufacturers offer multiple pairing methods.
Check Your Password Carefully
Wi-Fi passwords are case-sensitive.
If setup repeatedly fails, make sure you’re entering:
- Correct network
- Correct capitalization
- Correct numbers
- Correct punctuation
- No accidental spaces
A surprisingly small typo can make a perfectly functional camera look defective.
Step 8: Deal With 2.4 GHz vs 5 GHz Problems
This is one of the most common sources of smart-camera setup frustration.
Many security cameras still depend on 2.4 GHz Wi-Fi, although dual-band cameras are increasingly available.
If your camera supports only 2.4 GHz but your router combines 2.4 and 5 GHz under one network name, setup can occasionally become confusing.
Before changing router settings, check the instructions for your exact camera.
Depending on the camera and router, solutions may include:
- Making sure 2.4 GHz is enabled
- Connecting the phone to the appropriate network during setup
- Temporarily separating network names if the manufacturer recommends it
- Moving closer to the router during initial pairing
- Following a manufacturer-specific pairing method
Don’t permanently change network settings unless you understand what you’re changing.
As an example of why model-specific instructions matter, SYMYNELEC’s L1 documentation specifies 2.4 GHz and recommends separating bands when necessary, while other models from the company offer dual-band connectivity.
Step 9: Position the Camera
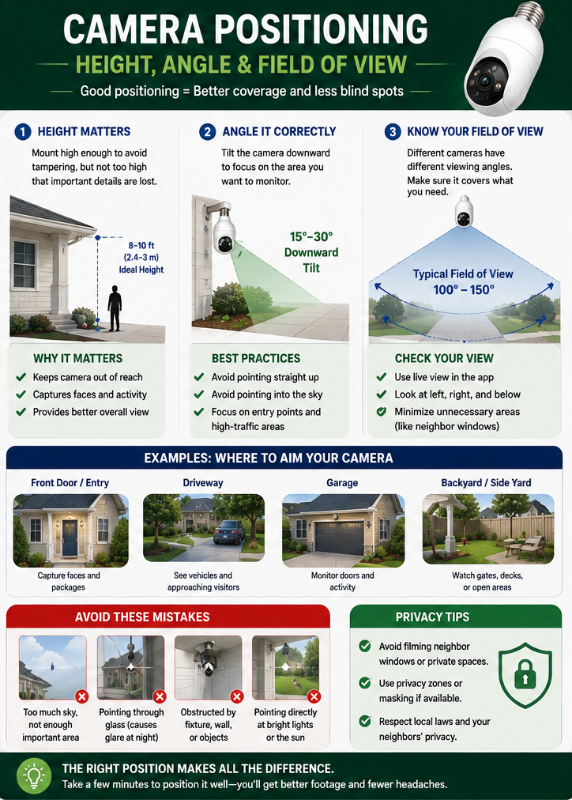
Once you have a live video feed, use the app to see exactly what the camera sees.
This is much better than guessing from underneath the fixture.
Check:
- Main entrance or area of interest
- Left and right edges
- Ground immediately below
- Distance coverage
- Bright lights
- Windows
- Reflective surfaces
- Neighbouring property
- Objects blocking the view
For Pan-and-Tilt Cameras
Move the camera through its available range.
Make sure the fixture doesn’t interfere with movement.
Then determine the default or “home” viewing position you want the camera to use.
Remember:
360° rotation does not necessarily mean 360° simultaneous viewing.
The camera can turn toward different areas, but the lens still has a defined field of view.
For Fixed Cameras
Positioning becomes even more important because you can’t remotely rotate the lens later.
Try to place the most important area near the centre of the image without wasting a large portion of the frame on ceilings, walls, or sky.
Step 10: Check Privacy Before Finalizing the View
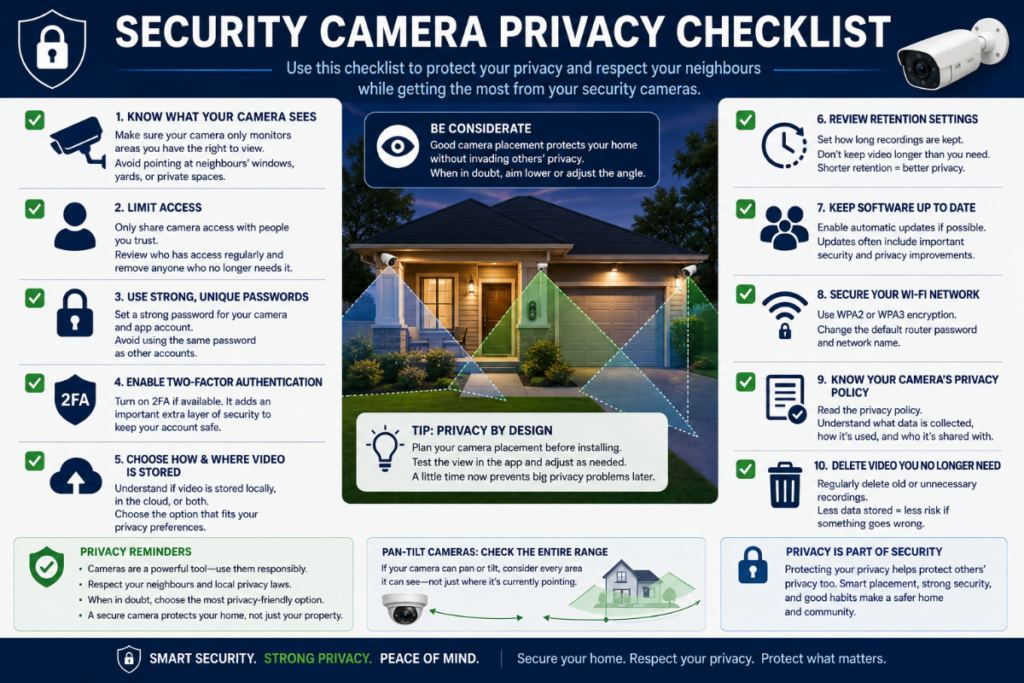
Before you’re satisfied with the perfect wide view, look at what else you’ve captured.
Does the camera unnecessarily point toward:
- Neighbouring windows
- Private yards
- Another apartment
- Shared spaces
- Areas unrelated to protecting your property?
Pan-and-tilt cameras deserve additional attention because the camera may be capable of looking far beyond its normal resting position.
Use privacy zones or masking features if your camera provides them and they’re appropriate for the installation.
For locations you’re uncertain about, see our Where NOT to Install a Light Bulb Camera guide.
Step 11: Configure Recording
Getting Live View working doesn’t necessarily mean the camera is recording.
Open the camera’s recording/storage settings and determine exactly how footage will be saved.
You may have options for:
Motion/Event Recording
The camera records when qualifying movement is detected.
This uses less storage but doesn’t create a continuous timeline.
Continuous Recording
The camera records continuously.
This usually requires local storage on cameras that support it and consumes substantially more storage.
Cloud Recording
Events or video are uploaded to the manufacturer’s cloud service.
This may require a subscription.
Local microSD Recording
Footage is stored on a memory card inside the camera.
Check:
- Supported card capacity
- Required format
- Whether the card needs formatting through the app
- Event vs continuous recording options
- What happens when the card fills
Don’t assume inserting a microSD card automatically activates recording.
Check the app afterward to confirm footage is actually being saved.
Step 12: Configure Motion Detection and Notifications
Factory-default motion settings aren’t necessarily appropriate for your location.
A camera pointed toward a street could potentially react to every passing vehicle.
A camera facing trees could generate unnecessary alerts from movement.
Depending on your camera, settings may include:
- Motion sensitivity
- Person/human detection
- Vehicle detection
- Animal detection
- Detection zones
- Tracking
- Alert schedules
- Notification frequency
Start with moderate settings and adjust them after seeing how the camera behaves for a few days.
Don’t Aim for Maximum Sensitivity
More alerts don’t automatically mean better security.
If your phone sends an alert every few minutes, you may eventually start ignoring them.
The goal should be useful notifications, not the largest possible number of notifications.
Step 13: Configure the Light
Remember that a bulb camera has two jobs:
Camera + light
Depending on the model, lighting options may include:
- Manual app control
- Motion activation
- Automatic schedules
- Dimming
- Sunrise/sunset schedules
- Smart-home automations
Set the light based on how you actually use the area.
For example, a porch camera could keep its light off normally but illuminate when appropriate motion is detected.
The exact available options depend on the camera.
Step 14: Install Firmware Updates
After connecting a new camera, check for available firmware updates.
Updates can potentially include:
- Security fixes
- Stability improvements
- Bug fixes
- Compatibility improvements
- New features
Don’t unplug the camera during a firmware update unless the manufacturer specifically tells you to do so.
Also consider enabling automatic updates if the manufacturer provides that option and you’re comfortable using it.
Step 15: Test Everything Before Calling the Installation Finished
Don’t stop after seeing the Live View.
Run through a real-world test.
Check:
☐ Live View
Can you reliably open the camera?
☐ Recording
Trigger an event and confirm you can play it back.
☐ Motion Detection
Walk through the monitored area.
☐ Notifications
Does your phone receive the alert?
☐ Night Vision
Check the image after dark.
☐ Lighting
Confirm the bulb/light behaves as expected.
☐ Two-Way Audio
If available, test both the microphone and speaker.
☐ Wi-Fi Stability
Check the camera again later rather than assuming one successful connection means the signal is reliable.
I would also test the camera from outside your home Wi-Fi network, such as over cellular data, if remote viewing is a feature you intend to use.
How to Position a Light Bulb Camera for a Better View
Installation height isn’t the only consideration.
The best position depends on what you’re trying to see.
For an entrance, you probably want useful views of people approaching rather than mostly the tops of their heads.
For a driveway, you may need a wider view.
For an indoor room, mounting too high can create an unnecessarily steep angle.
Think about:
Height + angle + distance + field of view
rather than searching for one “perfect” installation height that applies everywhere.
Also look at the image at night. A camera position that looks excellent during daylight can perform poorly after dark because of glare or infrared reflections.
Common Night-Vision Installation Problems
If nighttime footage looks washed out, foggy, or unusually bright, the camera may not necessarily be defective.
Infrared light can reflect from nearby surfaces.
Potential sources include:
- Glass
- Walls close to the lens
- Roof overhangs
- Decorative fixture surfaces
- Shiny objects
- Window screens
This is another reason enclosed fixtures can be problematic for some cameras.
Try adjusting the camera position and check the manufacturer’s night-vision recommendations.
Camera Won’t Connect? Troubleshooting Guide
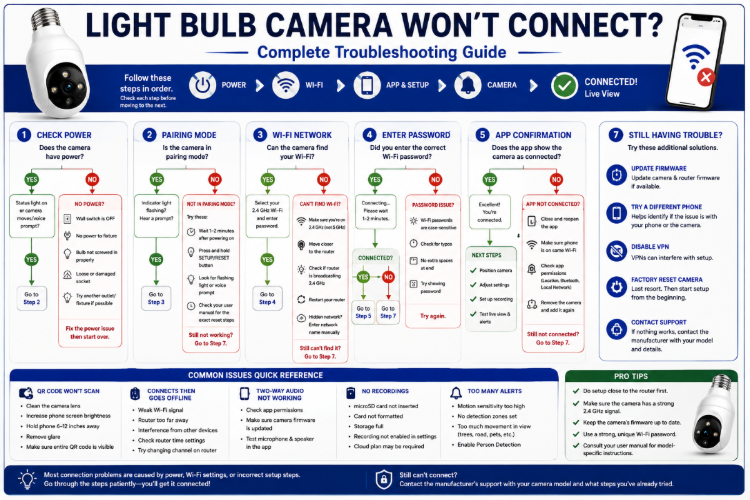
Setup problems are frustrating, but many have relatively simple causes.
Problem: Camera Has No Power
Check:
Is the wall switch on?
↓
Does the fixture normally work with another bulb?
↓
Is the camera properly seated in the socket?
↓
Does another switch control the fixture?
If the fixture itself isn’t working or appears damaged, stop troubleshooting the camera and address the electrical problem appropriately.
Problem: Camera Won’t Enter Pairing Mode
Try:
- Wait for the startup process to finish
- Check the status light
- Listen for pairing prompts
- Use the Setup/Reset procedure specified by the manufacturer
- Restart setup through the app
Don’t repeatedly factory-reset the device without checking its instructions.
Problem: Camera Can’t Find Wi-Fi
Check:
- Correct Wi-Fi band
- 2.4 GHz enabled if required
- Router isn’t too far away
- Wi-Fi password is correct
- Camera isn’t in a Wi-Fi dead zone
- Manufacturer’s required phone permissions are enabled
If possible, perform the initial pairing closer to the router to help determine whether distance is the problem.
Problem: QR Code Won’t Scan
Some cameras pair by scanning a QR code displayed on your phone.
If it won’t scan:
- Clean the camera lens
- Increase phone-screen brightness
- Remove glare
- Hold the phone steady
- Adjust the distance between camera and screen
- Make sure the QR code is fully visible
- Follow the manufacturer’s recommended distance
For comparison, Wyze recommends roughly 6–10 inches for QR-based setup on several of its conventional cameras, although its Bulb Cam currently uses a different Bluetooth-based setup process.
Again, follow the instructions for your actual model.
Problem: Camera Connects but Keeps Going Offline
There are two big possibilities:
Power Problem
Check whether someone is turning off the wall switch.
Also check whether the fixture is controlled by a timer, dimmer, smart switch, or other device that may interrupt power. Some bulb cameras specifically prohibit use with dimmers or timers; Wyze does so for its Bulb Cam.
Wi-Fi Problem
Check signal strength at the fixture.
A camera can sometimes complete setup with a marginal connection but later disconnect repeatedly.
If moving the camera temporarily closer to the router solves the problem, network coverage deserves investigation.
Problem: Camera Works but Doesn’t Record
Check:
- Is recording enabled?
- Is the microSD card recognized?
- Is the card formatted correctly?
- Is event recording enabled?
- Is continuous recording supported?
- Is cloud recording activated if required?
- Does the feature require a subscription?
- Is the camera’s date/time correct?
Trigger a test event and confirm that you can actually find and play the recording.
Problem: Too Many Motion Alerts
Reduce sensitivity or configure detection zones.
If supported, enable person detection instead of relying entirely on basic motion.
Also examine the camera view for:
- Trees
- Roads
- Sidewalks
- Flags
- Shadows
- Reflections
- Pets
Sometimes changing the camera angle works better than changing the software settings.
Problem: Night Vision Looks Terrible
Look for reflective objects near the lens.
If the camera is inside or behind glass, infrared illumination may reflect back into the camera.
Try repositioning the camera or adjusting night-vision/lighting settings.
Problem: Camera Stopped Working After Changing Wi-Fi
Changing your router, network name, or Wi-Fi password can require the camera to be reconfigured.
The exact procedure depends on the manufacturer.
For example, SYMYNELEC instructs users reconnecting one of its cameras to a new network to reset the camera, choose Add Device in the app, select the model, and enter the new Wi-Fi information.
Check your manufacturer’s instructions before resetting anything.
Outdoor Installation Requires Extra Care
If you’re installing the camera outdoors, there’s another layer to consider.
A camera being advertised as IP65 or “weather resistant” doesn’t necessarily mean every part of the installation can be exposed directly to rain.
Consider:
- Camera weather rating
- Socket protection
- Fixture rating
- Operating temperature
- Rain exposure
- Snow
- Installation orientation
- Manufacturer instructions
This is especially important because the electrical connection may have different limitations from the camera housing itself.
Our Best Light Bulb Cameras for Outdoor Use guide explains IP ratings, weather exposure, temperature, and socket protection in more detail.
Should You Install a Light Bulb Camera Yourself?
One of the main advantages of a bulb camera is that installation often requires little more than replacing a light bulb and completing app setup.
But there’s an important distinction between:
Installing a camera in an existing suitable socket
and
modifying an electrical installation to create a suitable socket.
The first is generally what bulb cameras are designed around.
The second may involve electrical work.
If you discover that the fixture, socket, or wiring needs modification or repair, don’t treat that as part of a simple DIY camera installation.
Use an appropriately qualified professional when necessary.
Light Bulb Camera Installation Checklist
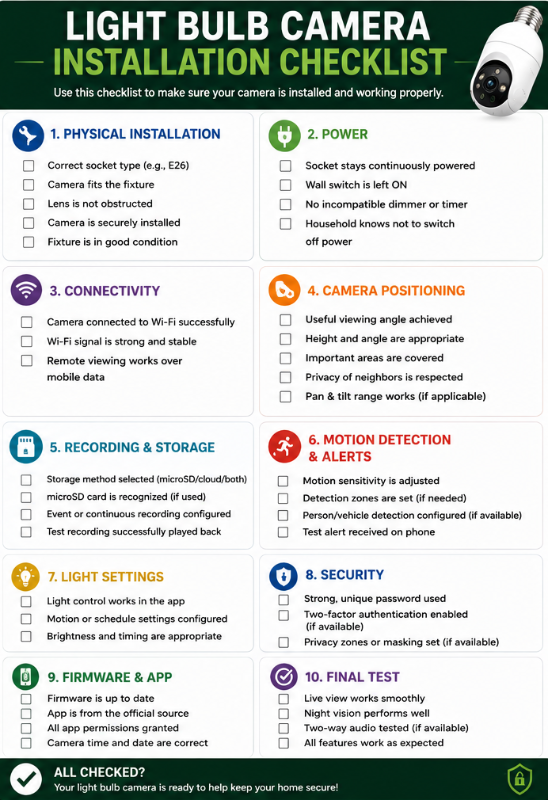
Before considering your installation complete:
Physical Installation
☐ Correct socket type
☐ Camera fits fixture
☐ Lens isn’t obstructed
☐ Camera is securely installed
☐ Fixture is in good condition
Power
☐ Socket stays continuously powered
☐ Household knows not to switch camera power off
☐ No incompatible dimmer/timer is being used
Connectivity
☐ Camera successfully connected to Wi-Fi
☐ Connection remains stable
☐ Remote viewing works
Camera Setup
☐ Useful viewing angle
☐ Night vision checked
☐ Privacy considered
☐ Motion sensitivity adjusted
☐ Detection zones configured if needed
Recording
☐ Storage method selected
☐ microSD card recognized if applicable
☐ Event/continuous recording configured
☐ Test recording successfully played back
Security
☐ Strong unique password
☐ Two-factor authentication enabled if available
☐ Firmware updated
☐ Manufacturer app came from a legitimate source
If everything checks out, your camera should be ready for normal use.
Frequently Asked Questions
Do you just screw a light bulb camera into a light socket?
Physically installing many bulb cameras can be that simple, but setup doesn’t end there.
You’ll generally need to download the manufacturer’s app, connect the camera to Wi-Fi, configure recording and motion settings, position the camera, and test its operation.
Does a light bulb camera need wiring?
A bulb camera generally receives power through an existing compatible light socket, so separate camera wiring usually isn’t required.
The socket itself still needs a suitable electrical supply.
Does the wall switch need to stay on?
Yes, if the switch controls electricity to the socket.
Turning the switch off cuts power to the camera.
The camera’s built-in light can often be controlled separately through its app while the physical socket remains powered.
Do light bulb cameras need 2.4 GHz Wi-Fi?
Many do, but not all.
Some modern bulb cameras support both 2.4 and 5 GHz networks.
Check the specifications for your exact model rather than assuming all bulb cameras have the same requirements.
Why won’t my light bulb camera connect to Wi-Fi?
Common causes include an incorrect password, unsupported Wi-Fi band, weak signal, the camera not being in pairing mode, incorrect app setup, or router/network configuration.
Start with the manufacturer’s setup instructions before changing your router.
Can I put a microSD card in before installing the camera?
That depends on the model.
If you’re using local storage, check the manufacturer’s instructions for when the card should be inserted, supported capacity, formatting requirements, and whether power should be off during insertion or removal.
Why does my bulb camera keep going offline?
First determine whether you’re dealing with power loss or Wi-Fi loss.
Check the wall switch and fixture first. Then investigate Wi-Fi signal strength and network stability.
Can I use a light bulb camera with a dimmer switch?
Don’t assume so.
Some cameras specifically prohibit dimmer use. Wyze, for example, says its Bulb Cam should not be used with a dimmer switch or timer.
Follow the instructions for your exact model.
Can I install a light bulb camera outdoors?
Only use a camera outdoors when the manufacturer specifies that the model is appropriate for outdoor use.
Also consider the fixture, socket connection, weather exposure, and operating-temperature range.
How do I know if the camera is actually recording?
Don’t rely solely on seeing a live picture.
Trigger a test event, open the recording/playback section of the app, and verify that you can find and play the footage.
Final Thoughts
Installing a light bulb camera is often considerably simpler than installing a traditional wired security camera, but successful setup involves more than screwing the camera into a socket.
The process is really:
Check compatibility → Turn off power → Install camera → Restore power → Install app → Pair camera → Connect Wi-Fi → Position view → Configure recording → Configure detection → Test everything
The most common problems usually come back to a few basics:
Power, Wi-Fi, positioning, storage, or configuration.
Check those systematically rather than repeatedly resetting the camera.
And remember that setup procedures aren’t universal. A SYMYNELEC camera, Wyze Bulb Cam, LaView camera, and other bulb cameras can use different apps, pairing methods, storage options, and network requirements.
Use this article as the overall installation roadmap, but use the manufacturer’s documentation for the exact buttons, status lights, pairing sequence, and electrical requirements of your particular model.